
Your Winix air purifier quietly works to remove allergens, dust, and pollutants from your home’s air. But when that filter indicator light turns on, it’s time to act. Ignoring this warning means your air quality steadily declines as the saturated filter loses its ability to capture harmful particles. This comprehensive guide shows you exactly how to replace Winix air purifier filter properly—no tools required and completed in under 10 minutes.
Knowing when and how to replace Winix air purifier filter ensures your family continues breathing clean, healthy air. Whether you own a basic model or premium unit with specialized filters, this guide covers every step from identifying your specific filter type to resetting the indicator after installation.
Recognize When Your Winix Filter Needs Replacement
Decoding the Filter Indicator Light
Your Winix air purifier features an intelligent filter replacement indicator that illuminates when filter saturation reaches critical levels. This system eliminates guesswork by monitoring actual filter performance rather than just time elapsed. Never operate your unit with a saturated filter—this forces the motor to work harder while allowing pollutants to recirculate through your home.
Standard replacement timelines vary by household conditions:
– Average homes: Replace every 12 months
– Pet owners: Change filters every 6-8 months due to increased dander
– Smokers or high-pollution areas: Replace every 3-6 months
– Construction zones: Install a new filter immediately after project completion
Environmental Factors That Shorten Filter Life
Your local environment significantly impacts how quickly your filter becomes saturated. Heavy cooking, wildfire smoke, or multiple pets can cut your filter’s effective lifespan in half. Watch for performance warning signs even if the indicator hasn’t activated—reduced airflow, lingering odors, or slower air quality improvements all signal it’s time for a filter swap.
Quick visual check: Hold a flashlight behind your filter. If light can’t pass through the material, replacement is overdue regardless of the indicator status.
Match Your Winix Model to the Correct Replacement Filter

Filter Compatibility Guide
Winix manufactures over 20 specialized filter types across multiple series. Using the wrong filter compromises performance and may damage your unit. Check your existing filter frame for printed model numbers or scan the QR code on your unit’s back panel to confirm exact compatibility.
Most common filter series:
– S Series ($41.99): Model 1712-0096-00 with optional AllergenGuard, PetGuard, or SmokeGuard
– A Series ($49.99): Model 115115 with enhanced versions featuring specialized coatings
– H Series ($49.99): Model 116130 – single option
– X2 Series ($104.99): Model 1712-0089-03 – premium HEPAMax option
Model-Specific Filter Requirements
Your Winix model determines exact filter compatibility:
– 5000 Series: Uses one specific filter type
– 5000S Series: Requires its own dedicated filter
– 5300 Series: Supports four different filter options
Pro tip: Before purchasing, verify your model number on the Winix website—many similar-looking units require completely different filters. Genuine filters include holographic authenticity stickers to prevent counterfeits.
Where to Buy Genuine Winix Replacement Filters
Current Filter Pricing & Discounts
Winix currently offers substantial savings across their filter lineup:
Economical options (30% off):
– Filter O: $34.99 (down from $49.99)
– Filter S: $41.99 (down from $59.99)
– Filter D: $62.99 (down from $89.99)
Premium performance filters:
– Filter X: $132.99 (down from $189.99)
– HEPAMax Filter K: $104.99 (down from $149.99)
Budget option: Filter U: $13.99 (down from $19.99)
Avoid Counterfeit Filter Risks
Purchase only from authorized sources:
– Winix official website (guaranteed authentic)
– Authorized retailers like Best Buy and Home Depot
– Amazon (only when “Sold by Winix” appears)
Counterfeit filters often fit poorly, reduce airflow, and may release particles back into your air. Genuine Winix filters feature precise dimensions and quality materials that maintain optimal purification performance.
Prepare Your Winix Unit for Filter Replacement
Essential Safety Precautions
Before starting how to replace Winix air purifier filter, always unplug the unit completely. This prevents electrical hazards and protects sensitive internal components during the replacement process.
Safety checklist:
– Turn off using the main power switch
– Unplug from the wall outlet
– Wait 5 minutes for internal capacitors to discharge
– Work on a clean, stable surface
Gather Necessary Supplies
Most Winix models require no tools for filter replacement. Prepare these items for a smooth process:
– Your new genuine Winix filter (keep it sealed until ready)
– Soft microfiber cloth for cleaning
– Small handheld vacuum with brush attachment
– Bright flashlight for inspection
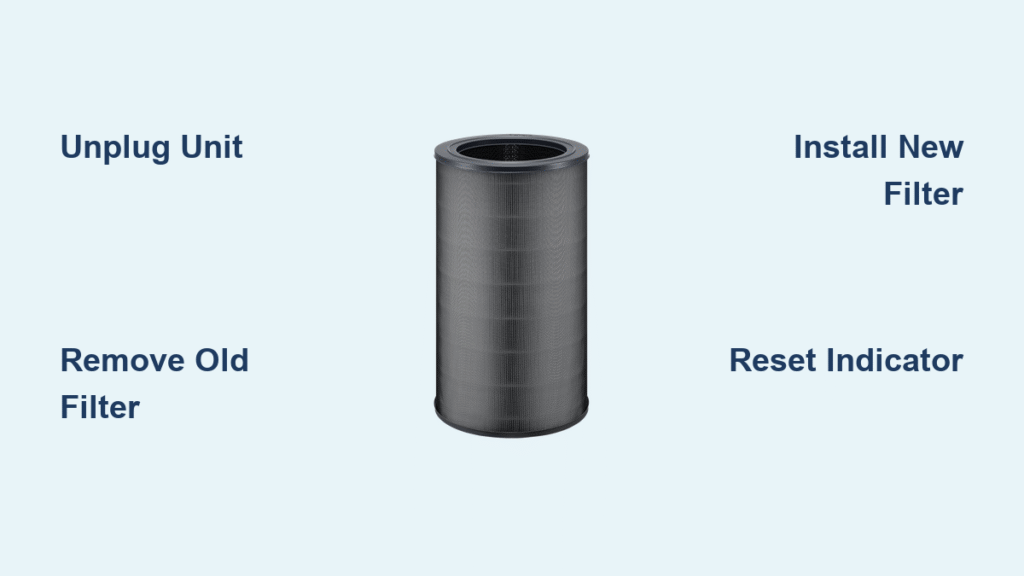
Expert tip: Take a photo of your old filter’s orientation before removal—it provides instant visual reference for proper installation of the new filter.
Remove Your Old Winix Air Purifier Filter
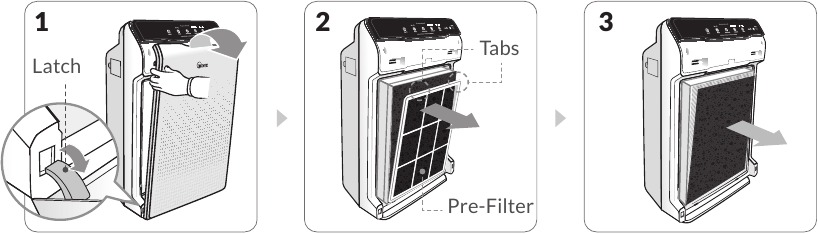
Access the Filter Compartment Correctly
Winix models follow a consistent access pattern:
1. Locate the front panel—secured by clips or magnetic latches
2. Press release tabs at both top corners simultaneously
3. Gently pull forward—the panel should release smoothly
4. Set panel aside on a clean surface
Extract the Saturated Filter Safely
Critical: Never pull the filter by its mesh—this damages the delicate filtration material. Instead:
– Grasp the plastic frame edges firmly
– Lift straight up to clear mounting pegs
– Slide toward you to remove completely
– Place immediately in a sealed garbage bag
Warning: Old filters contain concentrated pollutants. Handle gently to prevent trapped particles from scattering back into your home air.
Clean the Filter Compartment Before Installation
Vacuum Interior Components
With the old filter removed, thoroughly clean the empty compartment:
– Use soft brush attachment to remove dust from walls
– Pay special attention to corners and crevices
– Clean the air quality sensor window (small clear lens)
– Gently wipe accessible fan blades if needed
Inspect for Potential Damage
Check the compartment for:
– Cracks in plastic housing
– Bent or broken mounting clips
– Excessive dust buildup around motor
If you notice damage, contact Winix support before installing the new filter—continuing with damaged components voids warranty and creates safety hazards.
Install Your New Winix Filter Properly
Critical Filter Orientation Details
Filters install in only one direction—getting this wrong renders your unit ineffective. Look for these orientation indicators:
– Arrow symbols showing airflow direction
– “Front” label facing outward toward the room
– Color-coded tabs matching compartment markers
Secure Installation Process
- Align filter with compartment rails
- Slide forward until fully seated
- Press firmly on all four corners
- Listen for confirmation click
Test fit: Gently tug the filter—it shouldn’t shift. Loose installation allows unfiltered air to bypass the system completely.
Reset the Filter Indicator After Replacement
Model-Specific Reset Procedures
After completing how to replace Winix air purifier filter, reset the indicator:
1. Plug unit back in
2. Power on using main switch
3. Press and hold filter reset button for 3-5 seconds
4. Watch for indicator to turn off or blink confirmation
Model variations:
– 5000 Series: Reset button inside filter compartment
– 5300 Series: Touch-sensitive reset on control panel
– C535: Requires holding power + reset simultaneously
Troubleshoot Reset Failures
If the indicator remains lit:
– Recheck filter installation (remove and reinstall)
– Verify you’re pressing correct button combination
– Wait 10 seconds between reset attempts
– Unplug for 60 seconds to clear electronic glitches
Verify Your New Filter is Working Correctly
Initial Performance Testing
Run your purifier for 30 minutes and monitor:
– Normal operation: Steady airflow, quiet operation, indicator light off
– Warning signs: Reduced airflow, unusual noises, indicator reactivation
Break-in period: New filters may feel stiff initially. Run on medium speed for 24 hours to allow fibers to settle before returning to preferred settings.
Maintain Optimal Air Purifier Performance
Proactive Maintenance Schedule
- Weekly: Dust exterior with microfiber cloth
- Monthly: Vacuum air intake grilles
- Quarterly: Deep clean entire unit
- Annually: Replace filter regardless of indicator
Extend Filter Longevity
Smart usage tips:
– Run on auto mode to reduce unnecessary cycling
– Keep windows closed during high pollution days
– Position unit away from direct sunlight
– Change pre-filters (if equipped) every 3 months
Pro tip: Mark your calendar when installing a new filter. Set reminders at 80% of expected lifespan to avoid sudden performance drops.
Replacing your Winix air purifier filter properly restores peak performance and protects your family’s respiratory health. By following these precise steps for how to replace Winix air purifier filter, you maintain clean, healthy air throughout your home with minimal effort. Never ignore the filter indicator light—your Winix unit works hard to keep your air clean, and timely filter maintenance ensures it continues performing at its best for years to come. Mark your next replacement date immediately after installation to maintain consistent air quality protection.


