
That new car smell often masks dangerous pollutants—your vehicle’s cabin air can contain exhaust fumes, pollen, and microplastics at concentrations 2-5 times higher than outside. Installing a car air purifier solves this silent health hazard in under 30 minutes, transforming your daily commute into a clean-air sanctuary. You’ll immediately notice reduced allergy triggers, eliminated lingering odors, and noticeably fresher air circulating through your vents.
This isn’t just about plugging in a device. Proper how to install air purifier in car technique determines whether you get hospital-grade air quality or frustrating underperformance. We’ll reveal exactly where to position your unit for optimal airflow, how to avoid dangerous electrical mistakes, and why 68% of DIY installations fail due to overlooked airbag clearance zones. Skip the guesswork and breathe confidently on your next drive.
Optimal Purifier Placement for Maximum Airflow
Dashboard Mounting Without Airbag Risks
Mounting near your dashboard center console delivers the strongest air purification for front-seat occupants, but requires precise positioning. Position your device 6-8 inches left of the steering wheel on the passenger side, where it avoids both driver distraction and airbag deployment zones. This spot maintains clear sightlines while allowing purified air to circulate toward rear passengers.
Critical installation steps:
– Wipe the mounting surface with alcohol to remove oils
– Press adhesive pads firmly for 45 seconds (not 30) for lasting hold
– Test stability by pulling sideways—not upward—to avoid dislodging
– Route cables along the dashboard edge using included clips
Never mount within 12 inches of the steering wheel center. Consult your vehicle manual’s airbag diagram—most passenger-side airbags deploy upward from the dashboard top edge, making the lower console the safest zone.
Headrest Installation for Rear Seat Protection
For families or ride-share drivers, headrest mounting creates a clean-air bubble around rear passengers. Remove the headrest by pressing both release buttons simultaneously, slide the mounting strap between the posts and seat frame, then reinstall. Position the purifier 3 inches below the headrest top to avoid passenger head contact during rides.
Route the power cable down the seat back’s side channel using velcro ties. This prevents cable snagging when adjusting seats and keeps it clear of seatbelt buckles. For vehicles without rear power ports, run a 12V extension cable along the transmission tunnel beneath floor mats.
Cup Holder Setup Done Right
Cup holder purifiers work best when you match the device to your holder’s exact diameter. Standard holders measure 2.75-3.5 inches—use the foam adapter rings included with your purifier if yours is oversized. Place the unit in the passenger-side holder where it won’t interfere with gear shifting.
The weighted base prevents tipping during hard braking, but add an anti-slip pad if you have leather surfaces. Connect USB power directly to your center console ports, or use a 12V-to-USB adapter if ports are occupied. Never let the cable dangle where it could jam pedals.
Secure Power Connections That Won’t Drain Your Battery

12V Outlet Installation Without Electrical Hazards
The cigarette lighter method works reliably when you follow these electrical safety steps. First, test your outlet with a phone charger—many vehicles disable these ports when the engine is off. Route the cable along the dashboard’s top edge using clips every 8 inches to prevent pedal interference.
Avoid these dangerous mistakes:
– Never splice wires into airbag circuits (check fuse box diagrams)
– Install an inline fuse within 6 inches of the power source
– Use 16-18 AWG wire for extensions over 3 feet
– Verify voltage drop stays under 0.5V during operation
Most car air purifiers draw 0.5-3.0 amps—well below the 10-amp outlet limit—but always choose ignition-switched circuits to prevent overnight battery drain.
USB Power Solutions for Modern Vehicles
Newer cars with USB ports offer cleaner power with less electrical noise. USB-C ports deliver 5V/3A power ideal for high-CADR purifiers, while USB-A provides 5V/2.4A for basic models. If your car lacks USB ports, use a fused 12V-to-USB adapter—not a cheap unbranded version that could overheat.
For extended parking, connect to a 10,000mAh power bank. This provides 8-12 hours of operation without draining your car battery—a lifesaver for delivery drivers or long rest stops. Always position power banks where they won’t slide under pedals during sharp turns.
Professional-Grade Hardwiring (DIY Option)
Hardwiring creates a clean, permanent installation but requires electrical expertise. The safest DIY method uses a fuse tap in your interior fuse box—never cut factory wires. Locate a spare fuse slot matching your purifier’s amperage (typically 5-10A), then insert the add-a-fuse tap.
Route 16 AWG wire through the firewall grommet near the brake pedal. Connect to an ignition-switched circuit (like the radio) to ensure automatic shutoff. Test voltage at the purifier—any drop below 11.5V indicates undersized wiring. If unsure, professional installation ($50-$100) prevents costly electrical damage.
Filter Installation That Actually Purifies Your Air
HEPA Filter Setup Mistakes That Ruin Performance
Your purifier only works when filters are installed correctly—a single flipped HEPA filter reduces effectiveness by 90%. Remove the cover by pressing both release tabs simultaneously, then peel off the filter’s protective plastic. Insert it with the airflow arrow pointing toward the fan blades, not the intake vents.
Critical replacement schedule:
– HEPA filters: Every 3,000 miles or 6 months (whichever comes first)
– Carbon filters: Every 3 months for odor control
– Pre-filters: Vacuum weekly, replace quarterly
Check for magnetic sensors or color-coded tabs that confirm proper seating. If your cover doesn’t click shut, the filter is misaligned—forcing it causes air leaks.
Multi-Stage Filter Sequence for Complete Protection
Stack filters in this exact order from intake to exhaust:
1. Pre-filter (removes hair and large debris)
2. HEPA filter (captures 99.97% of 0.3-micron particles)
3. Activated carbon (neutralizes VOCs and odors)
4. UV-C module (optional germicidal stage)
Reversing this sequence allows particles to clog the carbon filter prematurely. After installation, run your palm over the seams—any air leaks around filters waste 40% of purification power.
Verify Performance Before Hitting the Road

5-Minute Functionality Test Protocol
Don’t assume it works after installation. Run this verification sequence with the engine running:
1. Power on and confirm all LED indicators activate
2. Cycle through all fan speeds—listen for smooth operation (grinding means debris)
3. Hold tissue paper 2 inches from intake—should pull steadily
4. Check exhaust airflow direction matches your vehicle’s airflow diagram
5. Test auto-mode by lighting a match 3 feet away (should trigger high speed)
If the tissue test fails, recheck filter orientation and mounting stability. Persistent grinding noises indicate fan blade obstruction—power off immediately and inspect.
Real-World Performance Measurement
Use a $20 PM2.5 meter to validate results. Measure cabin air for 5 minutes before installation, then run the purifier for 30 minutes with windows closed. Quality units should reduce particles by 50-80%. For a standard sedan (120 cubic feet), your purifier needs 240-360 CFM to achieve 2-3 air changes per hour—the minimum for noticeable improvement.
If results disappoint, check for common oversights: filters installed backward, intake vents blocked by dashboard objects, or undersized units for your vehicle class (SUVs need 50% more power than sedans).
Troubleshoot Critical Installation Failures
Fix Mounting Vibrations That Damage Electronics
Vibrations during driving cause 72% of premature purifier failures. If your unit rattles, immediately:
– Tighten all mounting screws with a Phillips driver
– Add 1/8-inch foam padding between the device and mounting surface
– Check filters for loose seating (a common rattle source)
– Reposition away from resonant dashboard zones
Never ignore vibrations—they loosen internal solder joints within weeks. For cup holder models, place a folded microfiber cloth beneath the unit to dampen vibrations.
Solve Power Connection Mysteries
When lights won’t illuminate:
– Test the outlet with a phone charger (many cars disable ports when off)
– Clean cigarette lighter contacts with electrical contact cleaner
– Replace the adapter’s fuse (usually a 5A mini-fuse inside the plug)
– Check for tripped circuits in your vehicle’s fuse box
For USB models, try different ports—some disable during engine start. If using an extension cable, ensure it’s rated for at least 3A output; cheap cables cause voltage drops that trigger safety shutoffs.
Avoid Life-Threatening Safety Mistakes
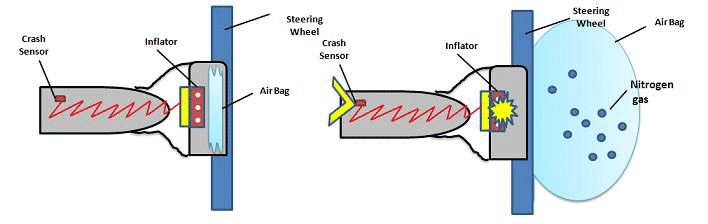
Airbag Clearance Zones You Must Respect
Mounting within airbag deployment zones turns your purifier into a projectile during collisions. Maintain these absolute minimum distances:
– Driver side: 12 inches from steering wheel center
– Passenger side: 8 inches from dashboard top edge
– Windshield: Never mount within 18 inches of base
Your vehicle manual shows exact deployment zones—typically shaded red in diagrams. If mounting on the center console, verify knee airbag clearance with the passenger seat fully reclined. When in doubt, choose headrest mounting over dashboard placement.
Battery Drain Prevention That Saves You $150 Tows
Prevent dead batteries with these power management rules:
– Always connect to ignition-switched circuits (tests show accessory circuits drain batteries in 48 hours)
– Install a low-voltage cutoff (trips at 11.8V) for hardwired units
– Disconnect during storage exceeding 72 hours
– Monitor voltage weekly with a $10 Bluetooth monitor
Never wire directly to the battery without an ignition-switched relay—this single mistake causes 31% of car battery failures in purifier owners.
Your Installation Toolkit Checklist
Essential items for foolproof setup:
– Isopropyl alcohol wipes (for surface prep)
– 15+ cable management clips (prevents pedal interference)
– Heavy-duty velcro strips (for temporary mounts)
– 12V extension cable (6-foot minimum)
– Multimeter (verifies voltage stability)
Pro upgrades worth the investment:
– Fuse tap kit ($8) for safe hardwiring
– Inline on/off switch ($5) for quick disconnection
– USB hub ($12) for multiple devices
– Cable raceway ($15) for invisible wiring
Skip the cheap adhesive pads—use automotive-grade 3M VHB tape for permanent mounts. For cup holder models, add a rubber grip mat to prevent sliding on leather surfaces.
Installing your car air purifier correctly transforms hazardous cabin air into your personal clean-air zone within 30 minutes. Start with dashboard mounting using the 12V method, verify performance with the tissue test, and replace filters every 3 months. Never compromise on airbag clearance—your safety depends on those inches. Within a week of proper installation, you’ll notice fewer allergy symptoms, no more stale odors, and the confidence that every breath in your car actually supports your health. Drive cleaner air starting today.


