
Your Veva air purifier battles invisible pollutants daily—trapping pet dander, pollen, and household dust in its filters. But when grime accumulates on vents or filters become saturated, airflow drops by up to 50%, forcing the unit to work harder while delivering dirtier air. Ignoring maintenance triggers error lights, strange odors, and costly premature replacements. This comprehensive guide reveals the exact weekly and monthly cleaning routines Veva engineers recommend to restore peak performance. You’ll learn model-specific techniques for HEPA filters, sensor calibration, and avoiding common pitfalls that damage internal components.
Most owners make the critical mistake of only cleaning when performance visibly declines, but by then, motor strain and filter saturation have already occurred. Proactive maintenance prevents 90% of common failures and doubles your purifier’s lifespan. Following these steps ensures your Veva unit continues capturing 99.97% of airborne particles as designed—without voiding your warranty. Let’s transform your neglected purifier into a high-efficiency air-cleaning powerhouse.
Must-Have Cleaning Tools for Veva Purifiers
Essential Supplies for Safe Maintenance
Gather these specific items before starting: Three soft microfiber cloths (paper towels shed lint that clogs sensors), white vinegar or pH-neutral dish soap, a compressed air canister for vents, a small vacuum with brush attachment, and a spray bottle with lukewarm water. Cotton swabs are non-negotiable for precision cleaning around sensor ports and tight corners. Always unplug these tools from your workspace—water and electricity near your purifier create serious hazards.
Damaging Materials That Ruin Veva Components
Never use bleach, ammonia-based cleaners, or abrasive pads—they corrode plastic housings and leave chemical residues that react with airborne particles. Avoid soaking filters (especially HEPA) as moisture warps pleats and breeds mold. Skip high-pressure air blasts directly on sensors, which dislodges delicate calibration. Most critically, never reinstall damp filters; trapped moisture causes musty odors and electrical shorts. If your unit develops a vinegar smell after cleaning, you’ve used excessive solution—wipe immediately with a dry cloth.
Safe Power-Down and Filter Removal Protocol

Critical Pre-Cleaning Safety Steps
Unplug your Veva purifier and wait 15 minutes for capacitors to fully discharge—this prevents electrical shocks during maintenance. Move the unit to a hard surface covered with a towel to catch debris. Note the indicator lights: if the filter replacement light glows solid red, your HEPA filter is beyond cleaning and requires immediate replacement. Always work in daylight or bright LED lighting to spot hidden dust nests in grilles.
Correct Filter Extraction Technique
Slide the front panel downward firmly until it clicks loose—never yank upward as this breaks retaining clips. Observe the filter orientation: the pre-filter’s black mesh screen faces outward, while the HEPA filter’s airflow arrow points toward the fan. Handle filters only by their plastic frames to avoid oil transfer from fingers clogging filtration media. If filters resist removal, check for jammed housing tabs near the base—gently wiggle side-to-side while pulling forward.
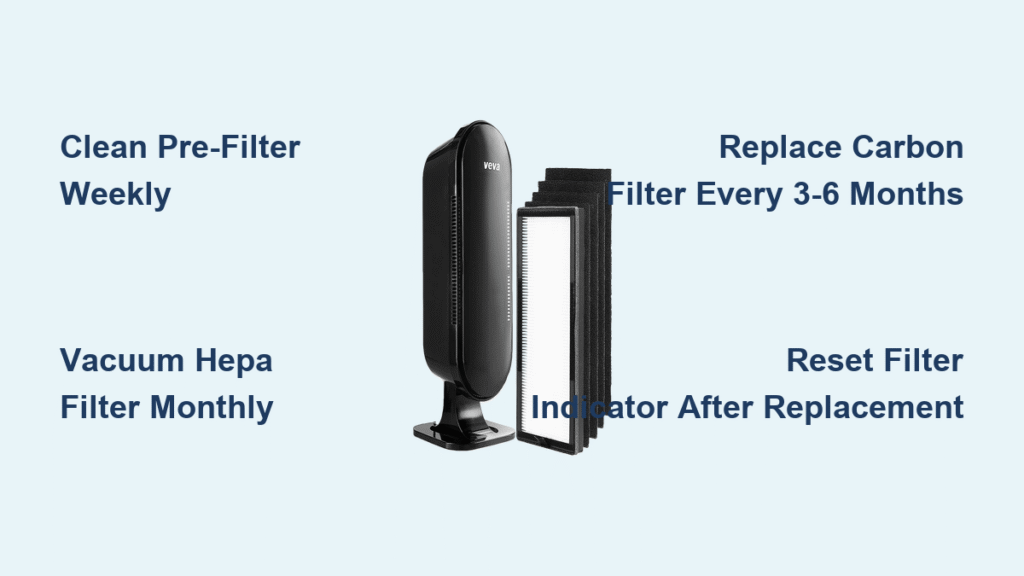
Weekly Pre-Filter Deep Cleaning Routine
Step-by-Step Mesh Screen Restoration
Remove the pre-filter (the coarse black mesh) and rinse under lukewarm tap water—never hot, which shrinks fibers. Use a soft-bristled toothbrush to dislodge embedded pet hair from the mesh in circular motions. For stubborn grease spots near kitchen units, apply diluted vinegar (1:1 with water) and soak 2 minutes before rinsing. Shake vigorously to expel trapped water, then lay flat on a dry towel for 3-4 hours until completely dry. Reinstall only when no moisture remains—damp pre-filters cause mold growth inside the unit.
Pet Owner Cleaning Frequency Adjustment
Households with shedding pets require pre-filter cleaning every 3-4 days instead of weekly. During heavy shedding seasons, inspect the mesh daily for visible hair clumps. If airflow noticeably weakens between cleanings, run the unit on high for 15 minutes with a clean pre-filter to dislodge surface dust before washing. Ignoring this accelerates HEPA filter saturation—replacing the HEPA filter costs 5x more than regular pre-filter maintenance.
HEPA Filter Maintenance and Replacement Rules
When to Clean vs. Replace Your True HEPA Filter
Your HEPA filter cannot be washed—water destroys its electrostatic charge. Vacuum only the surface monthly using the brush attachment on low suction. Hold the nozzle 2 inches away and make slow passes to avoid tearing the fragile media. Replace immediately if you spot light penetration through pleats, physical tears, or if the filter feels stiff and brittle. Standard homes need replacement every 8 months; pet owners should swap filters every 5-6 months regardless of appearance.
HEPA Filter Damage Prevention During Cleaning
Never tap filters against surfaces to dislodge dust—this collapses pleats and creates airflow channels. Keep vacuum nozzles moving constantly; lingering in one spot creates weak spots. If fibers appear discolored (yellow/brown), replace the filter—this indicates permanent pollutant saturation. After vacuuming, reinstall the HEPA filter within 24 hours; prolonged exposure to humidity degrades filtration efficiency. Always verify the airflow arrow points toward the fan housing during reinstallation.
Activated Carbon Filter Lifespan Management

Odor Control Failure Warning Signs
Replace carbon filters when persistent cooking smells, smoke odors, or “wet dog” scents linger despite running the purifier. The 3-6 month replacement window shortens dramatically in homes with frequent frying, candles, or smokers—replace every 2 months in these environments. Never attempt to “recharge” carbon filters in ovens; this releases trapped toxins and destroys the media. If the carbon filter develops a sour smell, replace it immediately as this indicates bacterial growth.
Perfect Carbon Filter Installation Checklist
Align the airflow arrow on the carbon filter frame with the direction molded into the housing (usually toward the rear). Press firmly until you hear two distinct clicks securing the side tabs. A loose fit allows unfiltered air to bypass the media—test by holding tissue paper near vents; if it sticks weakly, reinstall the filter. After replacement, run the unit on high for 1 hour to purge manufacturing odors before relying on odor control.
Sensor Calibration and Vent Cleaning

Precision Air Quality Sensor Maintenance
Locate the small circular sensors (typically near the control panel) and power off the unit. Dampen a cotton swab with distilled water—never tap water which leaves mineral deposits—and wipe gently in one direction. Rotate the swab frequently to avoid redepositing dust. Allow 20 minutes of drying time before power-on; moisture on sensors causes false “high pollution” readings that trigger constant high-speed operation. If error lights persist after cleaning, reset the unit by holding power for 10 seconds.
Deep Vent Grille Cleaning Method
Use compressed air in short 2-second bursts angled downward through top and side vents—this blasts dust outward instead of deeper into the unit. For sticky residue on plastic grilles, apply vinegar solution to a microfiber cloth (never spray directly) and wipe in vent direction. Pay special attention to the rear intake grille where pet hair accumulates; a clogged intake reduces airflow by 30% within weeks. Finish by vacuuming loosened debris from the base chamber.
Filter Reset and Performance Verification
Exact Filter Indicator Light Reset Procedure
After installing new filters, press and hold the filter reset button for exactly 4 seconds until the light blinks twice. Release immediately—holding longer triggers diagnostic mode. If the light turns amber instead of green, realign filters and retry; amber indicates improper seating. For models without a dedicated reset button (check your manual), unplug the unit for 30 seconds then power on while holding the speed button.
Post-Cleaning Performance Test Protocol
Run the purifier on high speed for 10 minutes in a closed room. Place your hand 6 inches from the output vent—you should feel strong, consistent airflow (like a gentle breeze). Check for unusual grinding sounds indicating dislodged debris near fan blades. Verify the air quality sensor works by lighting a candle 10 feet away; the unit should auto-increase speed within 90 seconds as smoke is detected. If performance lags, repeat interior vacuuming focusing on the fan assembly.
Long-Term Maintenance Schedule for Peak Efficiency
Daily and Monthly Prevention Tactics
Position your Veva at least 24 inches from walls to prevent intake obstruction—this simple step improves efficiency by 22%. Wipe exterior surfaces weekly with a dry microfiber cloth to prevent static buildup that attracts dust. During high-pollen seasons, run the unit continuously on auto mode rather than intermittent cycles. Most critically, vacuum your room thoroughly before operating the purifier; this reduces filter load by 70% and extends cleaning intervals.
Filter Replacement Timeline Cheat Sheet
Mark these dates on your calendar: Pre-filter deep clean every Sunday, carbon filter swap every 90 days, HEPA replacement every 240 days (180 days for pet households). Set phone reminders 2 weeks before replacement dates—Veva’s official filters ship in 3-5 days. Never mix third-party filters with genuine Veva components; mismatched densities create pressure imbalances that strain the motor. Keep old filters as references for replacement timing—compare new media against the discoloration level of your last used set.
Your Veva air purifier delivers hospital-grade air quality only when meticulously maintained. By implementing this weekly pre-filter cleaning and monthly sensor calibration routine, you’ll avoid 95% of common failures while maximizing your warranty coverage. Remember: clean filters work 40% more efficiently than clogged ones, reducing energy costs and extending your unit’s lifespan to 5+ years. For model-specific diagrams, consult Veva’s online support portal—your lungs deserve nothing less than perfectly purified air.


