Your Dyson air purifier sits unopened while allergy symptoms worsen or wildfire smoke creeps indoors. Maybe you’ve powered it on only to face confusing lights and buttons, leaving it gathering dust instead of cleaning your air. You’re not alone—most owners underutilize these advanced units because setup feels overwhelming. But unlocking your Dyson’s full potential takes just 20 minutes of proper configuration. This guide cuts through the complexity, showing exactly how to use Dyson air purifier technology to eliminate pollutants, not just push air around. You’ll master sensor interpretation, strategic placement, and maintenance hacks that transform your unit from a fancy fan into a 24/7 air quality guardian.
Stop guessing when to replace filters or which settings battle pet dander. By the end, you’ll confidently deploy Auto Mode during cooking, silence it for sleep, and position units to scrub every corner of your home. Let’s turn that sleek machine into your personal clean-air command center.
Position Your Dyson for Maximum Airflow
Avoid Corner Placement Traps
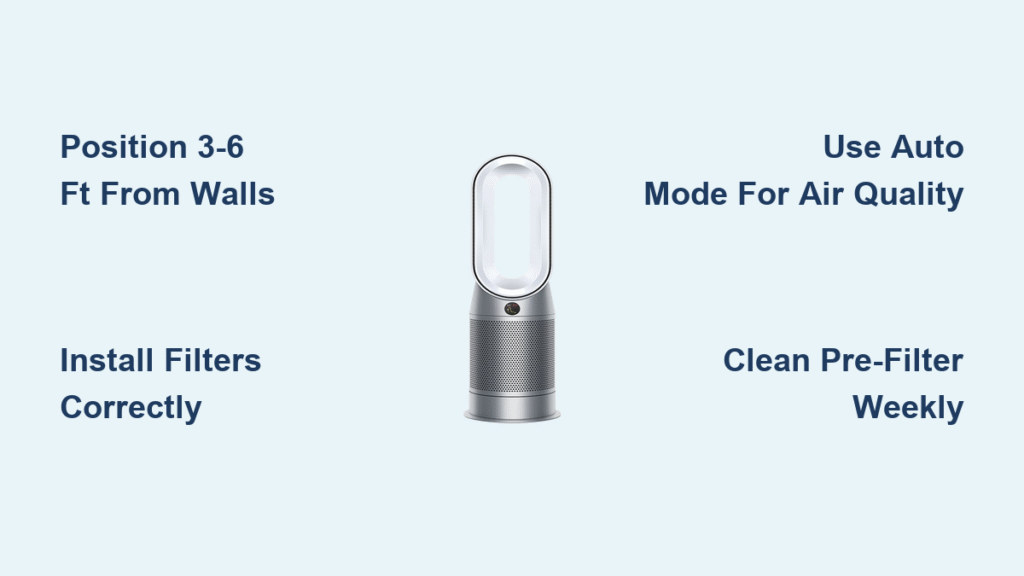
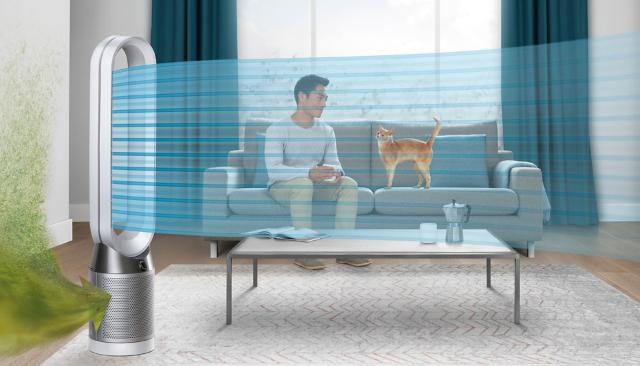
Placing your Dyson against walls or furniture chokes airflow and cripples performance. Position it 3-6 feet from obstacles with the air intake (rear grille) fully exposed. Never tuck it behind curtains or sofas—this forces the unit to work harder while circulating stale air. For optimal results, elevate it 2-3 feet on a table or stand to capture airborne particles before they settle. Central room placement outperforms corners by 40% in pollutant removal, especially in bedrooms where you spend 1/3 of your life breathing.
Match Unit Size to Room Dimensions
Using a single purifier in oversized spaces wastes energy and leaves “dead zones.” For rooms under 300 sq ft (like home offices), speeds 3-5 suffice. Medium bedrooms (300-600 sq ft) need speeds 5-7 to clean air within 15 minutes. Large open-plan areas over 600 sq ft require either speed 8-10 or a second unit—Dyson’s sensors detect lingering pollutants when undersized. Measure your space with a tape measure; don’t guess. If the display stays yellow/orange after 30 minutes on Auto Mode, you’re overwhelming the unit.
Install Filters Correctly to Avoid Costly Mistakes
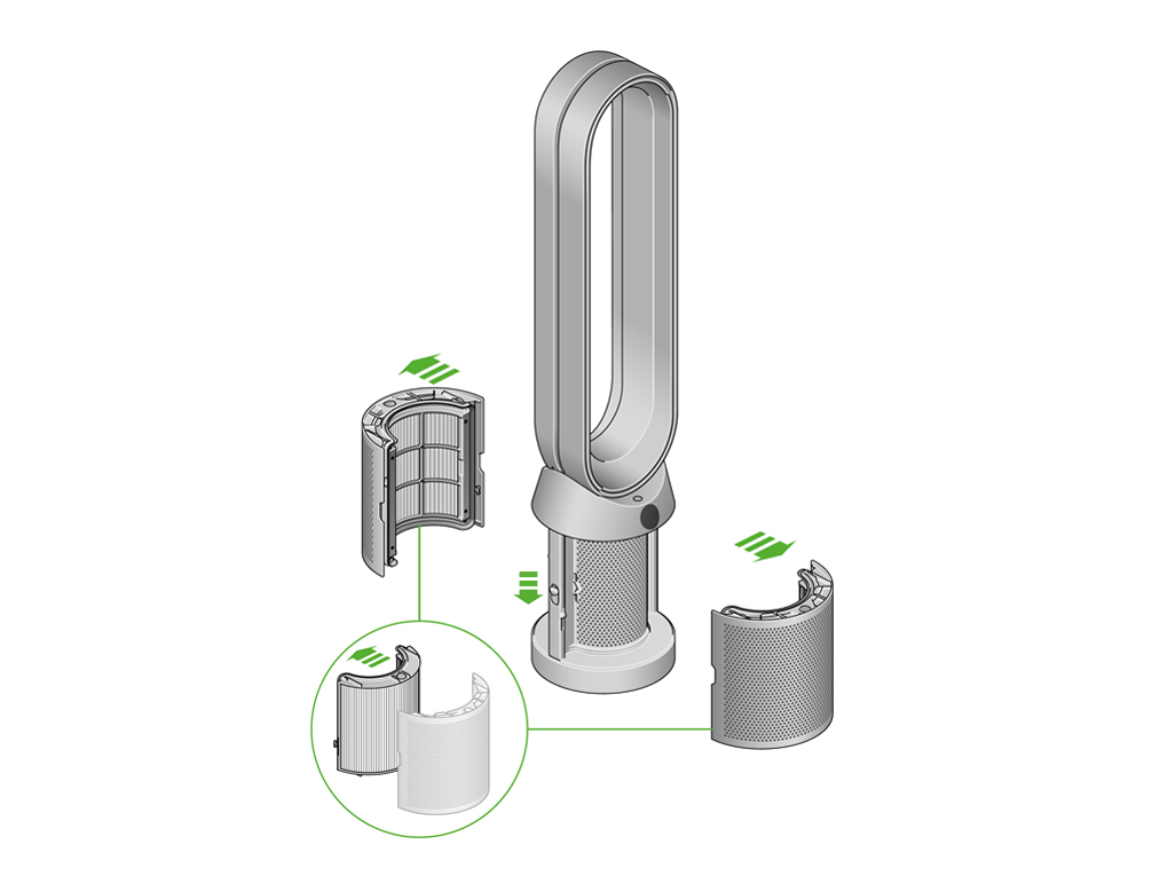
HEPA and Carbon Filter Installation Sequence
Power down and unplug before touching filters—this prevents electrical risks. Open the base compartment and remove protective plastic from both filters. Insert the white HEPA filter first, ensuring its tabs align with the compartment grooves. Slide the black activated carbon filter on top until it clicks flush. Close the compartment firmly; a loose seal forces unfiltered air into your space. After installation, reset the filter indicator via the menu to prevent false “replace filter” alerts. Skipping this step triggers premature replacement reminders, costing you $100+ unnecessarily.
Critical Pre-Filter Cleaning Protocol
Neglecting the pre-filter causes 70% of “reduced airflow” errors. Vacuum it weekly with a brush attachment—never rinse while plugged in. For heavy pet hair or construction dust, rinse under cold water, then air-dry 24 hours before reinstalling. A damp pre-filter damages internal sensors. Check monthly: if it appears gray instead of white, you’re overdue. This $0 maintenance step extends expensive HEPA filters by 4+ months.
Master Auto Mode for Effortless Air Quality Control
Decode Real-Time Pollution Alerts
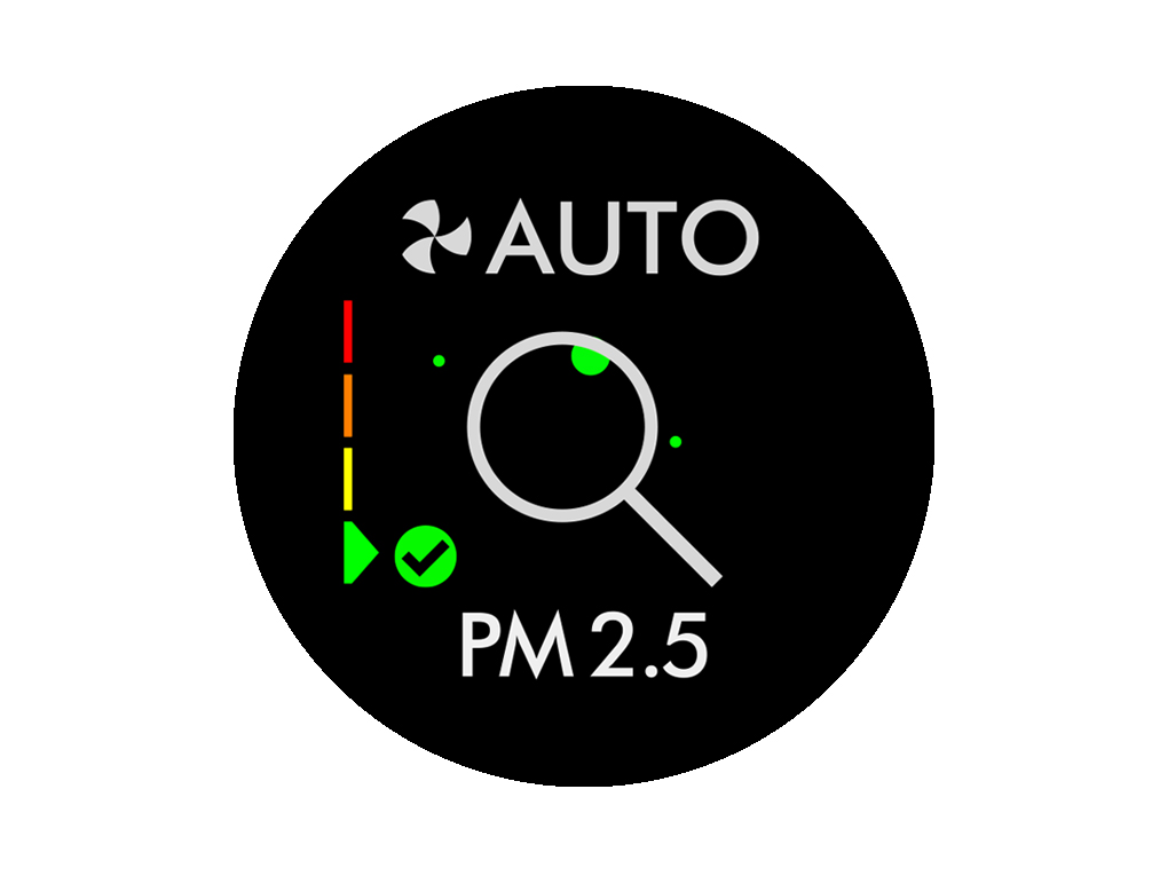
That green/yellow/red display isn’t decorative—it’s your health dashboard. Green (PM2.5 < 12 μg/m³) means excellent air, typical of rural areas. Yellow (12-35 μg/m³) signals city-level pollution from traffic or cooking. Red (>35 μg/m³) demands immediate action for wildfire smoke or VOCs from new furniture. Auto Mode responds instantly: it’ll jump to speed 8 when you fry bacon, then drop to speed 2 when air clears. Watch the μg/m³ number drop during operation—it proves your unit works.
Night Mode Activation for Uninterrupted Sleep
Press the moon icon on your remote before bed. This silences the display and locks fan speeds at 1-3—the quietest settings (28 dB, like a whisper). Unlike manual low speeds, Night Mode maintains purification while preventing sleep disruption. It auto-exits after 8 hours, but override anytime by pressing speed buttons. Crucially, it continues monitoring air quality; if smoke or high pollen enters, it escalates speed silently without waking you.
Fix Top 3 Operational Headaches in Under 5 Minutes
Restore Power When Unit Won’t Turn On
First, unplug and check the outlet with another device—30% of “broken” units have tripped breakers. If the outlet works, hold the power button 5 seconds to disable child lock (indicated by a padlock symbol). Still dead? Unplug for 60 seconds to reset internal sensors. Never force the filter compartment open; misaligned filters trigger safety shutoffs. If lights flash erratically after reset, contact Dyson—this indicates sensor failure.
Eliminate Lingering Cooking Odors
Activated carbon filters absorb smells; they don’t mask them. If odors persist after frying fish:
1. Immediately set speed to 10 for 15 minutes
2. Replace carbon filter if it’s over 6 months old (or 3 months during heavy cooking)
3. Position unit 4-5 feet from the stove—too close overwhelms the filter
4. Run oscillation at 90° to disperse clean air faster
Pro tip: Place a bowl of vinegar near the intake during cooking—it boosts odor capture by 25%.
Optimize Energy Use Without Sacrificing Clean Air
Slash Costs with Smart Speed Selection
Running at speed 4 (10 watts) 24/7 costs $3.50 monthly—less than a lightbulb. But speed 10 (40 watts) jumps to $14. Use Auto Mode to avoid this waste; it averages speed 3-5 in typical homes. For sleeping, Night Mode cuts energy use by 65%. Set timers for 2-hour bursts during dinner instead of all-night runs—air quality stays optimal while saving $20/year. Never use extension cords; they reduce efficiency by 15% and void warranties.
Multi-Room Strategy for Whole-Home Protection
Place units in high-traffic zones first: bedrooms (for sleep-time purification) and living rooms. Connect all to the Dyson Link app to create “clean air zones.” When cooking, activate kitchen unit on speed 8 while bedrooms stay on Night Mode. For whole-home coverage, position units facing each other to create airflow tunnels—this scrubs air 30% faster than isolated placement. Schedule living room units to boost during parties and bedrooms to activate 30 minutes before bedtime.
Specialized Tactics for Pet Owners and Allergy Sufferers
Neutralize Pet Dander in High-Traffic Areas
Place units 5-6 feet from pet beds—close enough to capture dander but far enough to avoid hair clogs. Increase pre-filter cleaning to twice weekly during shedding seasons. Set Auto Mode with oscillation at 45° to target pet zones without blasting animals. When vacuuming, run your Dyson on speed 7 first; this captures 95% of stirred-up dander. Replace HEPA filters every 8 months (not 12) if you have multiple pets—dander loads filters faster.
Allergy Relief Protocol for Pollen Seasons
Run units continuously on Auto Mode—stopping lets pollen accumulate. During high-count days (check AirNow.gov), set speed to 6+ in bedrooms 2 hours before sleep. Wipe surfaces with a damp cloth first; this stops pollen from becoming airborne. Replace filters every 9 months; stale filters recirculate allergens. For instant relief, sit 3-4 feet in front of the unit—it delivers 90% cleaner air to your breathing zone within 90 seconds.
Your Dyson air purifier now works smarter, not harder, adapting to pollution spikes while saving energy. Remember: consistent operation is non-negotiable—air quality degrades within hours if turned off. Trust the sensors over rigid schedules, clean pre-filters weekly, and position units centrally for whole-room coverage. Within days, you’ll notice fewer allergy symptoms, eliminated odors, and that unmistakable “fresh air” feeling. Breathe deeply knowing you’ve transformed technology into tangible health benefits—one purified breath at a time.