
Your dehumidifier hums along, lights blinking normally, yet the collection bucket remains bone dry. This frustrating scenario affects thousands of households annually, leaving rooms musty and uncomfortable. The gap between apparent operation and actual water collection signals deeper issues ranging from simple setting mistakes to complex mechanical failures. Most homeowners immediately assume their unit has failed when, in reality, 80% of these problems stem from environmental conditions or basic maintenance needs.
This guide walks you through every possible cause with clear, actionable steps. You’ll diagnose environmental factors, fix mechanical problems, and restore your dehumidifier’s moisture-pulling power without guesswork. Whether your unit is freezing up in a cold basement or simply needs a filter cleaned, you’ll find the solution that gets water flowing again in under an hour.
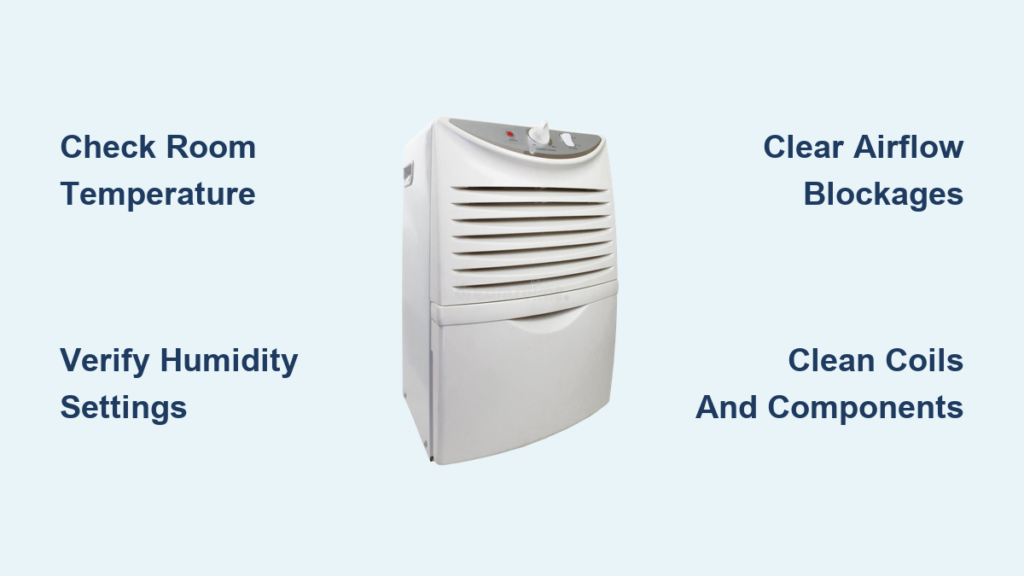
Check Room Temperature First
Cold rooms kill dehumidifier performance instantly. When air drops below 60°F (16°C), moisture freezes on the coils instead of dripping into your bucket. This common issue plagues basement units during winter months and affects older models without frost protection systems.
Quick Temperature Test:
– Place a thermometer 3 feet from your unit
– Check readings after 30 minutes
– Note any temperature fluctuations throughout the day
If your space consistently stays below 60°F, your dehumidifier can’t operate effectively. The moisture in the air freezes on contact with the cold coils, forming ice that blocks further condensation. You might notice your unit running constantly without producing water or shutting off automatically due to frost buildup.
Cold Room Solutions:
– Move the unit to a warmer area temporarily
– Add a space heater to raise ambient temperature
– Install cold-weather models designed for basements
– Create insulated enclosures for crawl space units
Look for ice visible on front coils, reduced air output, or automatic shutoff engaging repeatedly. These are clear indicators your environment is too cold for standard operation. Consider upgrading to a desiccant dehumidifier if you regularly need moisture control in spaces below 65°F.
Verify Humidity Settings
Your dehumidifier won’t collect water if it’s already achieved the target humidity level. Many homeowners set their units to 50% humidity but don’t realize their space has naturally dropped to 45%, causing the machine to cycle off appropriately. This isn’t a malfunction—it’s working exactly as designed.
Setting Check Steps:
1. Display current room humidity with a separate hygrometer
2. Compare to your unit’s set point
3. Lower the target to 35-40% temporarily
4. Monitor water collection for 2-4 hours
Common mistakes include setting humidity too high (above 60%), using “Auto” mode during naturally dry periods, or accidentally activating timer functions that create false pauses. During summer months, set your unit to 45-50% for living areas and 40-45% for basements. For storage areas with valuable items, maintain 35-40% to prevent mold growth.
Clear Airflow Blockages

Restricted air circulation prevents moisture from reaching the coils, eliminating water collection entirely. Furniture pushed too close to your unit or dust-clogged filters are silent killers of dehumidifier performance. Your machine needs unobstructed pathways for both intake and exhaust air to function properly.
Intake Inspection Checklist:
– Remove visible dust from front grills
– Pull furniture 18+ inches away
– Check for curtain interference
– Vacuum pet hair from intake areas
Exhaust Clearance Requirements:
– Maintain 12-inch minimum from walls
– Ensure vents blow freely, not into corners
– Check for storage items blocking output
– Verify no recirculation of dried air
Most manufacturers recommend at least 12 inches of clearance on all sides. During cleaning, unplug the unit and use a soft brush attachment to remove dust from both intake and exhaust vents. Pay special attention to the area behind the unit where dust bunnies accumulate.
Clean Coils and Components
Dirty coils act like insulation, preventing the temperature drop needed for condensation. Dust and grime buildup on evaporator coils is the second most common reason for poor water collection after environmental factors. This issue develops gradually, causing your unit to work harder while collecting less moisture.
Evaporator Coil Cleaning:
1. Unplug unit and let coils warm
2. Use soft brush attachment on vacuum
3. Spray coil cleaner for heavy buildup
4. Rinse gently, let dry completely
5. Test operation before replacing cover
Check both evaporator coils (usually at the front) and condenser coils (typically on the back or side). Straighten any bent fins carefully with a butter knife or fin comb. While cleaning, inspect fan blades for dust accumulation and wipe them down with a damp cloth. Wobbling blades or unusual noises indicate potential motor issues.
Compressor Failure Diagnosis
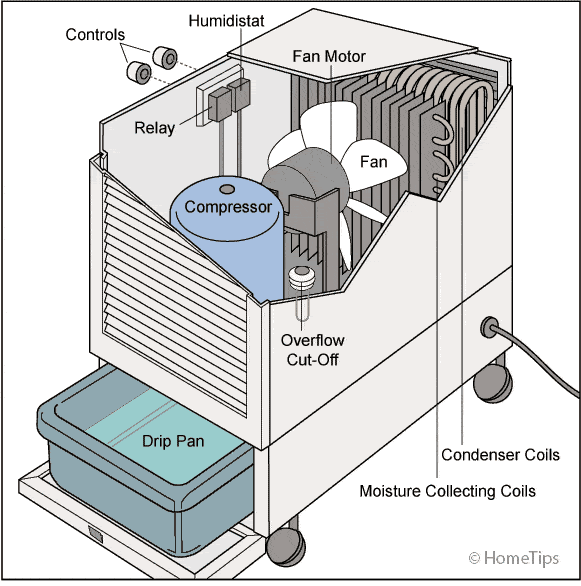
The compressor drives the entire refrigeration cycle. When it fails, your unit runs but produces no cooling or water. Listen for the distinctive “click” sound when your dehumidifier starts up—this indicates the compressor engaging. No click means your compressor isn’t activating despite the fan running.
Warning Signs:
– Continuous humming without cooling
– Clicking sounds every few minutes
– Hot compressor housing
– Tripped breakers during operation
Check the start capacitor—a small cylindrical component that provides the initial power surge to start the compressor. If bulging or leaking, it needs replacement. Use a multimeter to test for continuity if you’re comfortable with electrical components. When in doubt, consult a professional, as compressor repairs often cost more than replacement units.
Quick Diagnostic Protocol
Follow this systematic approach to identify the root cause quickly without wasting time on unnecessary repairs.
Step 1: Environment (5 minutes)
– Measure room temperature and humidity
– Verify 12+ inch clearance on all sides
– Check for external moisture sources
– Ensure doors/windows stay closed
Step 2: Settings (3 minutes)
– Set humidity to 35% minimum
– Switch to continuous operation
– Reset any timer functions
– Disable auto-restart features
Step 3: Visual Check (10 minutes)
– Inspect air pathways for blockages
– Clean visible filter buildup
– Check water bucket placement
– Look for ice on coils
Step 4: Performance Test (2-4 hours)
– Run in continuous mode
– Monitor exhaust air temperature
– Check for water collection
– Note any automatic shutoffs
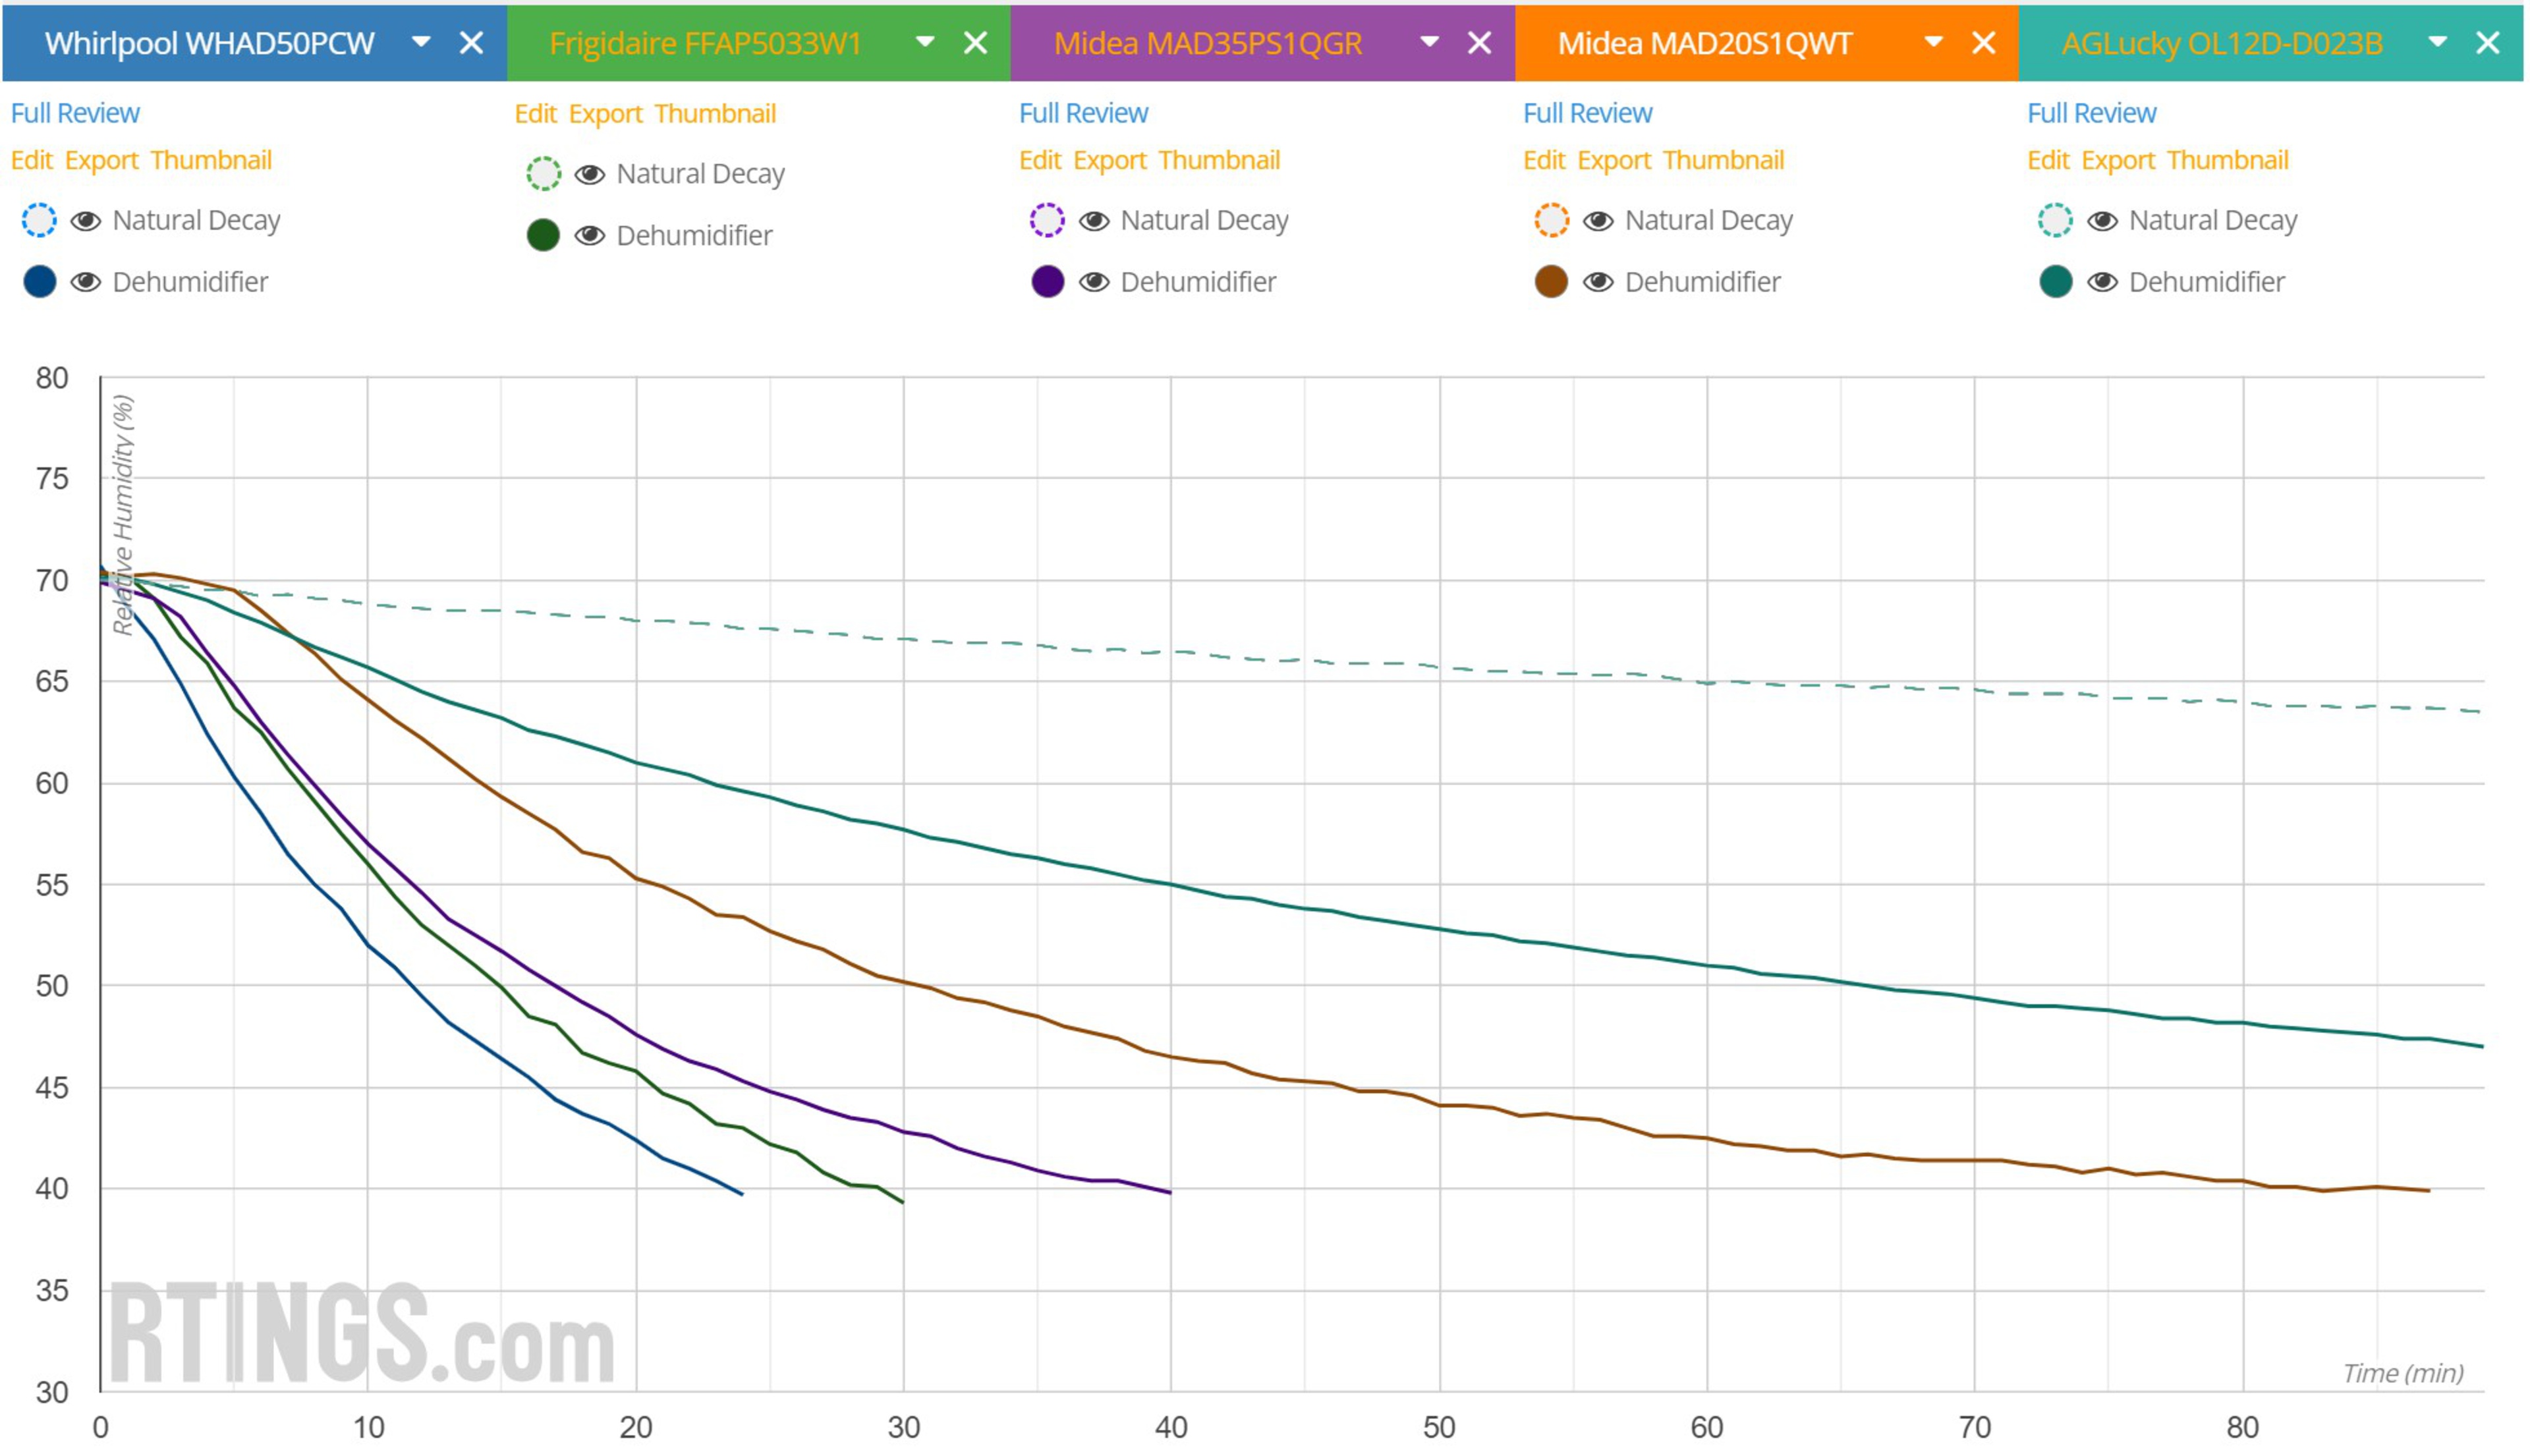
This protocol solves 90% of “not pulling water” issues. Most problems are environmental or maintenance-related rather than mechanical failures. If your unit still won’t collect water after completing these steps, consider professional repair or replacement.
Preventive Maintenance Schedule
Regular maintenance prevents most water collection failures. Create a simple routine that takes less than 15 minutes weekly to keep your dehumidifier operating at peak efficiency.
Monthly Deep Clean:
– Wash or replace filters
– Clean coils with appropriate cleaner
– Inspect electrical connections
– Verify drainage system operation
Annual Service:
– Professional refrigerant check
– Electrical connection tightening
– Sensor calibration verification
– Comprehensive performance test
Set calendar reminders for maintenance tasks. Track water collection amounts weekly—sudden drops indicate developing problems before they become serious. Keep replacement filters on hand and replace them immediately when dirty, not just when the indicator light comes on.
When Replacement Makes Sense
Sometimes fixing the problem means upgrading to a better unit. Consider replacement if your dehumidifier is older than 8 years or shows multiple component failures. Modern units offer significant advantages including smart humidity sensors, Wi-Fi monitoring capabilities, and Energy Star efficiency ratings that cut operating costs by 25-30%.
Newer models feature self-cleaning technologies that prevent coil buildup and pump drainage systems that eliminate bucket emptying. If repair costs exceed half the price of a new unit, replacement becomes the economical choice. Look for models specifically designed for your environment—basement units with cold-weather operation or crawl space models with remote monitoring capabilities.
Emergency Actions Checklist
When your dehumidifier stops working completely, take these immediate steps before calling for professional help:
Power and Reset:
1. Unplug for 5 minutes, then restart
2. Check circuit breaker position
3. Test outlet with another device
4. Reset to factory defaults
Quick Fixes:
– Empty water bucket fully
– Clean filter even if not visibly dirty
– Move 2 feet from nearest wall
– Close all room doors/windows
If you notice burning electrical smells, repeated breaker trips, or suspect a refrigerant leak (oily residue near connections), stop using the unit immediately and contact a professional. These indicate serious safety hazards that shouldn’t be ignored.
Final Troubleshooting Summary
Your dehumidifier’s failure to collect water typically stems from environmental conditions, simple maintenance needs, or component failures. Start with the quickest checks—temperature, settings, and airflow—before diving into mechanical repairs. Most issues resolve through proper settings, thorough cleaning, or minor component replacement.
When professional repair costs exceed half the price of a new unit, consider upgrading to modern, more efficient models. Regular maintenance prevents 80% of water collection problems, making your dehumidifier a reliable ally against excess moisture for years to come. Remember that seasonal humidity changes naturally affect water collection—your unit working perfectly in summer might seem “broken” during dry winter months if you don’t adjust expectations accordingly.


