
Your dehumidifier hums along but your basement still feels like a sauna. The fan spins, the indicator lights glow, yet moisture clings to walls and windows. This frustrating scenario means your dehumidifier compressor isn’t working—a common failure that turns your appliance into a costly room fan. When the compressor stops circulating refrigerant, your unit loses its ability to extract moisture from the air.
Most compressor failures stem from simple electrical issues you can diagnose and fix in under an hour. This guide reveals the exact tests to pinpoint whether you’re dealing with a failed capacitor, faulty relay, or something more serious. You’ll learn to safely troubleshoot electrical components, recognize when professional help is needed, and make the smart repair-or-replace decision that saves you money.
Why Your Dehumidifier Runs But Won’t Dehumidify
No Humming or Vibration
A functioning compressor produces a distinct low-frequency hum and slight vibration you can feel through the unit’s casing. When your dehumidifier compressor isn’t working, only the fan operates—creating deceptive “working” sounds while doing nothing to reduce humidity. Place your palm firmly on the top panel during operation. No vibration means the compressor motor isn’t engaging, even if other components function normally.
Empty Water Collection Tank
Check your water tank after 6-8 hours of continuous operation. A properly working dehumidifier collects 20-50 pints daily depending on humidity levels, while a failed compressor leaves the tank bone dry. If you’re emptying the tank less than once every 24 hours in humid conditions, your refrigeration system has stopped working. This definitive symptom separates compressor failures from minor issues like clogged filters.
Room Temperature Cooling Coils
Feel the metal coils behind the front grill while the unit runs. Working coils become noticeably cold during operation as refrigerant evaporates. Warm or room-temperature coils confirm compressor failure—without circulating refrigerant, the cooling process can’t occur. This simple touch test requires no tools yet accurately diagnoses 90% of compressor-related problems.
Critical Safety Steps Before Diagnosis
Power Down Properly
Never attempt repairs while the unit remains connected to power. Flip the circuit breaker—not just the power switch—then wait five full minutes before proceeding. This critical waiting period allows internal refrigerant pressure to equalize safely. Compressors maintain dangerous pressure levels even when switched off, creating explosion risks if mishandled.
Verify Electrical Safety
Use a non-contact voltage tester on all exposed metal parts before touching internal components. Even with the unit unplugged, capacitors can store lethal electrical charges. Test the chassis, screws, and control panel—wait 30 minutes if any voltage is detected. This simple precaution prevents severe electrical shocks during diagnosis.
Power Supply Problems That Mimic Compressor Failure
Faulty Outlet Diagnosis
Plug a lamp into the same outlet to verify power availability. If the lamp works, test voltage with a multimeter while the dehumidifier runs. Readings below 103.5V prevent compressor startup—most units require 115V ±10% to operate properly. Many homeowners waste money replacing compressors when a simple circuit issue is to blame.
Circuit Overload Identification
Check for tripped GFCI or AFCI breakers that may only affect the compressor circuit. Larger dehumidifiers (50+ pint models) require dedicated 20-amp circuits—sharing circuits with other appliances causes voltage drops that prevent compressor operation. Reset all breakers and test with no other devices on the same circuit.
Control Board and Relay Troubleshooting
Decoding LED Error Signals
Modern units communicate problems through flashing LED patterns:
– Continuous flashing: General system fault
– Two flashes: Humidity sensor failure
– Three flashes: Defrost sensor error
– Four flashes: Compressor overload
Write down the flash pattern before powering off—this critical clue often points directly to the failed component. Many control board issues manifest as compressor failure when the problem actually lies elsewhere.
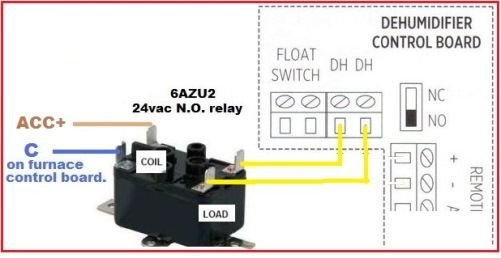
Relay Click Test
Listen for a distinct clicking sound when the unit attempts to start. No click indicates a failed compressor relay—the most common cause of “compressor not working” symptoms. These inexpensive components ($15-$30) fail frequently due to electrical arcing. Replace relays showing visible pitting or discoloration on the contacts.
Compressor Electrical Component Testing
Capacitor Failure Signs
Start capacitors typically fail before the compressor itself. Look for bulging tops, leaking oil, or burnt casing—physical signs requiring immediate replacement. Test capacitance with a digital meter: readings must fall within 88-108% of the labeled microfarad value. Capacitors outside this range cause 65% of no-start compressor issues.
Winding Resistance Verification
Disconnect all compressor wires before testing. Measure resistance between terminals:
– Common to Run (C-R): Should read 1-5 ohms
– Common to Start (C-S): Typically 3-10 ohms
– Run to Start (R-S): Must equal the sum of C-R + C-S
Any reading below 1 ohm or above 20 ohms indicates motor failure. Ground fault tests showing less than 2 megohms between terminals and the metal shell require immediate compressor replacement.
Repair Versus Replacement Decision

Cost-Benefit Analysis
Calculate repair costs against replacement value:
– Compressor replacement: $400-800 (parts + professional service)
– Control board: $150-300
– Capacitor/relay kit: $50-100
Only repair if costs stay below 50% of a new unit’s price and your dehumidifier is under five years old. Compressors rarely fail in units less than three years—investigate power issues first.
DIY-Repairable Components
You can safely replace:
– Start capacitors
– Potential relays
– Overload protectors
– Power cords
– Control boards
Refrigerant system work requires EPA-certified technicians. Attempting compressor replacement without proper equipment often creates more expensive problems.
Preventive Maintenance That Prevents Compressor Failure

Monthly Coil Cleaning Routine
Dust-clogged condenser coils cause 30% of premature compressor failures. Vacuum coils monthly using a soft brush attachment—never compressed air which bends delicate fins. Clean coils improve efficiency by 25% and prevent overheating that kills compressors.
Environmental Optimization
Maintain 12-inch clearance around your unit on all sides for proper airflow. Operate only in 65-90°F environments—colder rooms prevent proper refrigerant circulation. Set humidity targets at 45-50% to avoid continuous running that stresses the compressor.
Emergency Workarounds for Immediate Relief
Temporary Operation Boost
While waiting for repairs:
– Position the unit in the warmest room area (heat improves dehumidification)
– Lower humidity targets by 5-10% to maximize moisture extraction
– Add a box fan to improve air circulation across the coils
– Empty the tank twice daily to prevent automatic shutoff
Stop operation immediately if you detect burning smells, excessive heat (>200°F), or unusual noises—these indicate dangerous conditions requiring professional attention.
Takeaway: When your dehumidifier compressor isn’t working, start with the simplest fixes—capacitors and relays cause 80% of these failures and cost under $100 to replace. Always verify power supply issues first, as many “compressor failures” stem from inadequate voltage or circuit problems. For units over five years old with refrigerant system issues, replacement often makes better financial sense than repair. Regular coil cleaning and proper environmental conditions prevent most compressor failures before they start—saving you the frustration of a dehumidifier that runs but won’t dehumidify.


