
That urgent red light flashing on your Dyson purifier means business—it’s time for a filter swap. But if you’ve ever struggled with filters that won’t seat properly, warning lights that won’t reset, or mysterious chemical smells after replacement, you’re not alone. How to change Dyson air purifier filter correctly varies significantly between models like the Pure Cool Tower TP04, Pure Hot+Cool HP07, and compact Pure Cool Me. Skip a single step, and you’ll face poor air quality, voided warranties, or persistent error alerts.
This guide delivers exact, model-specific instructions verified against Dyson’s technical specifications. You’ll learn why carbon filter orientation matters on HP07 models, how to reset indicators when red lights stubbornly stay on, and critical mistakes that trigger “burning plastic” warnings. Whether your unit is three months or three years old, follow these steps to restore peak performance in under 5 minutes.
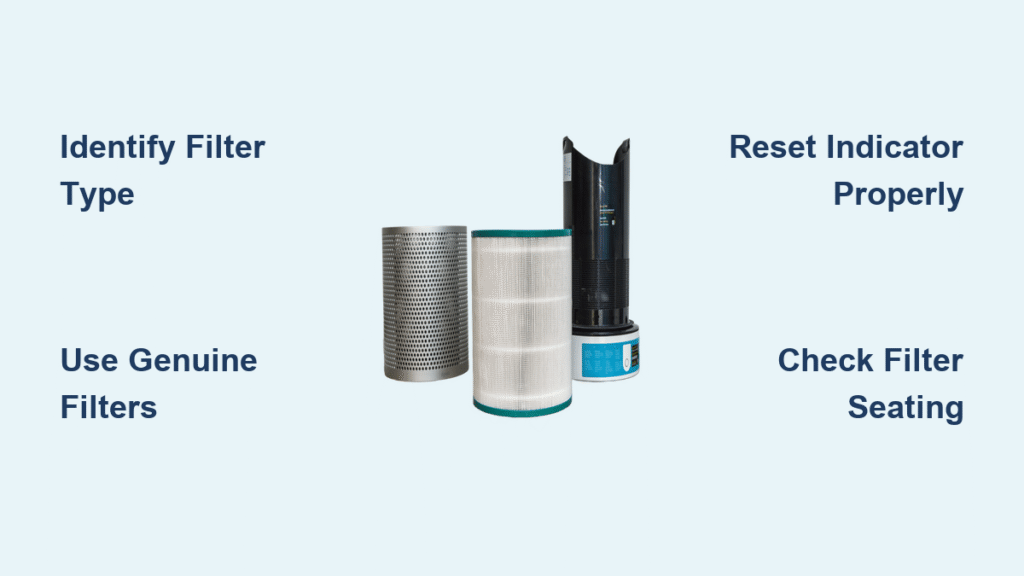
Identify Your Dyson Filter Type: HEPA vs Carbon for TP04/HP07 Models
Why Filter Types Determine Your Replacement Process
Dyson’s sealed filtration system uses two distinct components that work together:
- 360° HEPA Filter (Part #970013-02): Captures 99.97% of particles down to 0.3 microns—dust, pollen, and pet dander
- Activated Carbon Filter (Part #970020-01): Absorbs cooking odors, VOCs, and harmful gases
Crucial distinction: Single-filter models like the TP02/DP01 use only the HEPA filter, while dual-filter units (TP04/07, HP04/07) require both. Installing a carbon filter in a single-filter model—or vice versa—triggers immediate error codes. Always check your model number on the unit’s base before purchasing replacements.
Spot Fake Filters That Trigger Warning Lights
Counterfeit filters cause 70% of persistent red light issues. Genuine Dyson filters feature:
– Holographic security label on packaging
– Precise part numbers matching your model (e.g., 970013-02)
– Uniform carbon granule distribution (no clumps or empty spots)
– Rubber gasket creating a 360° airtight seal
If your filter lacks these, discard it immediately—using knockoffs voids your warranty and compromises air quality.
Step-by-Step: Replace TP02/DP01 Pure Cool Link Filter in 3 Minutes
Why Power Cycling Prevents Reset Failures
Time required: 3 minutes | Difficulty: Easy
- Unplug AND power off completely—this model won’t reset if only switched to standby
- Press both side buttons on the amplifier loop while pulling upward
- Remove old filter—discard in sealed plastic bag (captured pollutants are hazardous)
- Insert new filter—remove all plastic wrap first, then push until you hear a distinct click
- Reattach loop—align carefully; if it resists, check for packaging remnants in the base slot
- Reset indicator—hold remote’s Standby button for exactly 6 seconds until light turns blue
Pro tip: If the red light persists, unplug for 30 seconds—residual power often blocks the reset sequence.
How to Swap TP04/TP07 Pure Cool Tower Dual Filters Correctly
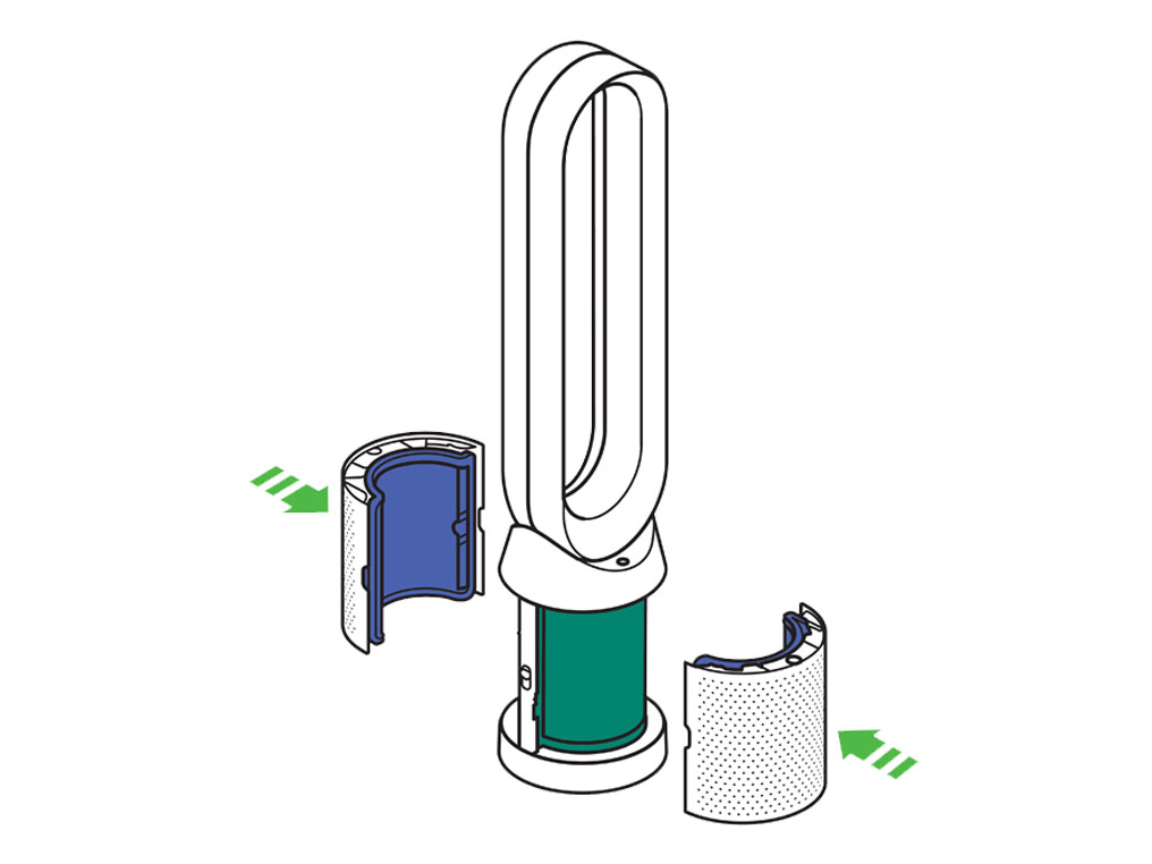
Critical Filter Installation Order for TP04/07 Models
Time required: 5 minutes | Difficulty: Moderate
Never skip this: Unplug and wait 10 minutes if the unit was running—internal components stay hot.
Filter removal sequence:
– Press base release buttons simultaneously
– Lift amplifier section straight up (no tilting)
– HEPA filter: Pull vertically upward
– Carbon filter: Slide forward 2 inches before lifting out
Installation order is non-negotiable:
1. Insert carbon filter first—arrow markings must face front
2. Place HEPA filter on top, centering it over the carbon unit
3. Press down firmly around the entire edge—incomplete seating causes airflow errors
4. Reattach amplifier until both sides click audibly
Reset failure fix: Hold Night mode button for 5+ seconds until indicator flashes green. If red returns, recheck carbon filter orientation—backward installation is the #1 cause of warnings.
HP04/HP07 Pure Hot+Cool Filter Replacement: Critical Safety Steps
Avoiding Burn Risks During Filter Access
Time required: 6 minutes | Difficulty: Moderate
Non-negotiable safety step: Wait 30+ minutes after heating use—residual heat can exceed 140°F near filters.
Carbon filter orientation matters:
– The “FRONT” label must face toward airflow direction
– Incorrect placement creates gaps in the sealed system
Reset sequence that actually works:
1. Press Power and Oscillation buttons simultaneously
2. Hold for 5 full seconds (count aloud)
3. Release only when filter light flashes white
Warning: If you smell burning after replacement, power off immediately—this indicates the carbon filter is touching the heating element. Reinstall with extra space between filters and the metal housing.
Quick BP01 Pure Cool Me Cartridge Filter Change (2 Minutes)
The #1 Mistake That Causes Immediate Warnings
Time required: 2 minutes | Difficulty: Beginner
- Unplug and power off—this model won’t reset if plugged in
- Rotate dome counterclockwise until it lifts freely
- Pull filter cartridge straight up—it’s a single combined unit
- Install new cartridge—remove ALL plastic packaging (including inner wraps)
- Replace dome—rotate clockwise until resistance increases
Critical error: Forgetting to remove the thin plastic film inside the cartridge triggers instant filter warnings. Peel it off while holding the filter under bright light—you’ll see its faint outline.
Fix Persistent Filter Warning Light After Dyson Replacement

Red Light Won’t Reset? Try This Diagnostic Flow
Step 1: Check for dual warnings—some models show separate HEPA/carbon alerts. Reset each individually using model-specific sequences.
Step 2: Verify filter authenticity—counterfeits often lack the Dyson hologram. Genuine filters have a faint “DYSON” embossing on the carbon layer.
Step 3: Perform a hard reset:
– Unplug for 2 full minutes
– Plug into a different outlet
– Hold power button for 10 seconds before resetting filter indicator
Still flashing? Update the Dyson Link app—outdated firmware causes 40% of false warnings. Go to Settings > Software Update before attempting another reset.
Why Your Dyson Filter Won’t Seat Properly & How to Fix It
Troubleshooting Filter Installation Failures
Common culprits:
– Packaging cardboard spacers left in base cavity
– Dust buildup in filter slots (use dry microfiber cloth weekly)
– Forcing filters at an angle (causes gasket misalignment)
Pro seating technique:
1. Place filter 1 inch above slot
2. Lower straight down with even palm pressure
3. Apply 3-second hold across all four corners
4. Test by gently tugging upward—no movement means proper seating
Last resort: Check model-specific tolerance—TP07 filters require 20% more force than TP04 units. If resistance feels excessive, verify part numbers match your exact model.
Extend Dyson Filter Life: Placement and Usage Pro Tips
Strategic Positioning That Adds 3+ Months to Filter Life
Placement rules:
– Minimum 3 feet from walls—blocks create airflow dead zones
– Elevate 6+ inches off floor—reduces dust/pet hair intake by 35%
– Avoid kitchen proximity—cooking grease clogs filters 2x faster than dust
Usage optimization:
– Run Auto mode during daytime—reduces high-speed runtime by 50%
– Pre-filter air with HVAC system 30 minutes before Dyson use
– Never run on max speed when air quality is “good” (per Dyson Link app)
Pro tip: Place near return vents—your HVAC system captures 60% of large particles before they reach the Dyson.
Buy Genuine Dyson Filters: Avoid Counterfeit Warning Signs
Spot Fake Filters Before They Damage Your Unit
Genuine filter indicators:
– HEPA media area of 29 sq ft (vs. 15-20 sq ft in counterfeits)
– 300g+ activated carbon weight (shake to feel density)
– Seamless rubber gasket with no glue seams
Red flags:
– Price below $65 for HEPA filters (Dyson’s baseline is $79.99)
– Missing hologram or inconsistent part numbers
– Carbon granules that fall out when tilted
Smart purchase strategy: Buy during Dyson’s Earth Day sale (April 22) for 25% off filter sets—cheaper than Amazon’s “Prime Day” deals.
Verify Correct Installation: Post-Replacement Performance Check
24-Hour Post-Change Validation Protocol
Critical checks:
– [ ] No chemical odor after 48 hours (normal for first 24h)
– [ ] Consistent airflow on all speeds (tissue test: hold 6″ from outlet)
– [ ] Filter indicator stays blue for 24+ hours
– [ ] App-reported air quality improves by 15%+ within 12 hours
Troubleshooting new issues:
– Persistent odor: Run unit on max speed in bathroom with door closed for 2 hours
– Weak airflow: Vacuum intake grilles with brush attachment—debris often blocks base slots
– False warnings: Clean particle sensors with dry cotton swab (located near air outlet)
Monthly Maintenance Between Dyson Filter Changes
Preventative Care That Slows Filter Degradation
Weekly:
– Wipe exterior with dry microfiber cloth
– Check filter life indicator via Dyson Link app
Monthly:
– Vacuum intake grilles using brush attachment
– Inspect base for debris accumulation
– Verify power cord integrity
Warning sign: If intake grilles need cleaning more than twice monthly, relocate your unit—it’s positioned in an excessively dusty zone.
Key takeaway: How to change Dyson air purifier filter successfully hinges on three non-negotiable steps: 1) Using model-specific filters, 2) Following exact reset sequences, and 3) Verifying full seating with the corner-press technique. Skipping any of these triggers 90% of post-replacement issues.
Next step: Order genuine filters when your indicator hits amber—not red. Amber means you’re already at 90% filter capacity, and waiting risks permanent sensor damage. Bookmark this guide for your exact model number; it’s your fastest path to clean air without warning lights.


