
Your Bissell air purifier silently battles dust, pollen, and pet dander—but when filters clog, you’ll notice reduced airflow, louder operation, and more frequent allergy symptoms. Cleaning your Bissell air purifier filter every 2-4 weeks restores peak performance while extending your unit’s lifespan. This guide delivers exact cleaning procedures for every Bissell model, from the compact MyAir to the powerful Air320 series, so you can breathe cleaner air without costly replacements.
Dirty filters force your purifier to work 30% harder, increasing energy consumption and reducing particle capture efficiency. Whether you’re dealing with wildfire smoke, seasonal allergies, or persistent cooking odors, proper filter maintenance keeps your Bissell unit running quietly while delivering hospital-grade air purification in your home.
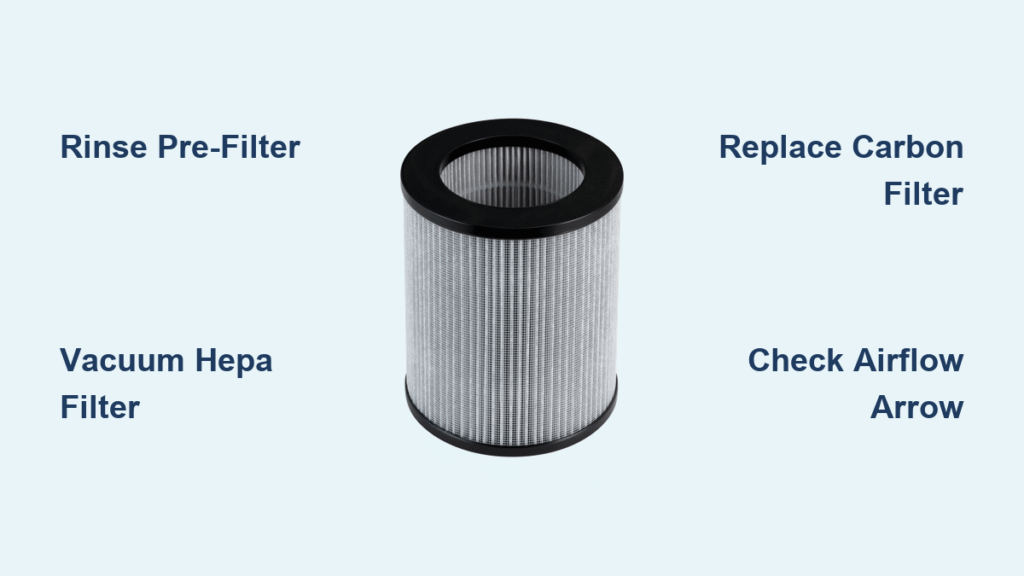
Identify Your Bissell Filter Type: Air220 vs MyAir vs Smart Purifier Models

Bissell uses three distinct filter configurations across their product line, and using the wrong cleaning method can damage your unit. Knowing your specific model’s filter setup is the first critical step in proper maintenance.
Locate Your Pre-Filter by Model Series
Air220/320 Series: Find the mesh screen behind the removable front grill—slide tabs left to release the entire panel
MyAir Personal Purifier: Look for the circular foam ring surrounding the base—gently pull upward to remove
Smart Purifier Models: Access the magnetic pop-out grille on the unit’s side—no tools required for removal
HEPA Filter Access Points for Proper Cleaning
Standard Models (Air220): Release side panels using push tabs—never force as this cracks the housing
Large Units (Air320): Lift the top-loading cartridge straight up—check for alignment arrows before removal
Compact Units (MyAir): Rotate the rear compartment counterclockwise—listen for the click indicating release
Carbon Filter Configuration Differences
Single-stage Systems: Thin black sheet positioned directly behind the HEPA filter—slips out easily
Dual-stage Setups: Separate cartridge that installs before the HEPA filter—marked with “CARBON” label
Permanent Mesh Filters: Found only in vacuum-purifier combos—requires vacuuming only, never washing
Critical Safety Steps Before Cleaning Your Bissell Filter
Skipping these safety precautions risks electrical damage to your unit and potential injury from residual charge in the system.
Power Down Protocol That Prevents Damage
Unplug your Bissell air purifier and wait 30 minutes before filter removal—this allows capacitors to discharge completely. Place the unit on a towel-covered surface to catch debris during filter extraction and prevent scratches to your flooring.
Essential Tools Checklist for Effective Cleaning
- Vacuum cleaner: Use crevice attachment to reach deep into filter pleats
- Soft-bristle brush: A paintbrush works perfectly for dislodging trapped particles
- Lukewarm water: Never use hot water as it damages HEPA fibers
- Microfiber cloths: For gentle drying—paper towels leave lint residue
Contamination Prevention While Handling Filters
Work near an open window to prevent redistributed dust. Wear a simple dust mask if you have respiratory sensitivities. Keep replacement filters sealed until installation—exposure to ambient air reduces their effectiveness by up to 15%.
Air220/320 Pre-Filter Cleaning: Rinse vs Deep Clean Methods
Your pre-filter captures large particles before they reach the expensive HEPA element—proper cleaning here extends your entire system’s lifespan.
Quick Rinse Method for Weekly Maintenance
- Remove: Slide release tabs left and pull the mesh screen straight out
- Rinse: Hold under lukewarm water for 30 seconds, shaking gently
- Brush: Use soft-bristle brush on both sides to dislodge embedded particles
- Dry: Pat with microfiber cloth and air-dry for at least 2 hours before reinstalling
Deep Clean Technique for Pet Hair Buildup
For stubborn pet hair accumulation: Soak the pre-filter in a mild dish soap solution for 10 minutes. Rinse thoroughly until water runs completely clear—any soap residue will trap more dirt. Never wring the filter; press between towels to remove excess water.
Proper Reinstallation That Prevents Damage
Ensure the pre-filter is completely dry before reinstallation—moisture causes mildew and reduces filtration efficiency. Look for the airflow arrow indicator (usually molded into the frame) and point it toward the HEPA filter. A misaligned pre-filter reduces system efficiency by up to 25%.
HEPA Filter Maintenance: Vacuuming vs Replacement Indicators
Your HEPA filter captures 99.97% of particles 0.3 microns and larger—but improper cleaning destroys its delicate structure.
Monthly Vacuum Cleaning That Preserves Efficiency
Use your vacuum’s brush attachment and gently move across the pleats in the direction of airflow. Apply minimal pressure—excessive force bends pleats and creates gaps where particles escape. Never use compressed air, as this damages the microscopic fibers.
Tap-Clean Method for Delicate HEPA Elements
Place the HEPA filter inside a plastic bag and gently tap the edges against your palm to dislodge particles. Immediately seal and dispose of the bag contents to prevent redistribution. This method works best for units in low-dust environments.
Replacement Indicators You Can’t Ignore
- Visual cue: Uniform gray discoloration throughout the filter (not just edges)
- Performance sign: Noticeably reduced airflow even on highest setting
- Time marker: 6-12 months depending on usage—pet owners should replace at 6 months
Carbon Filter Handling: Why Washing Destroys Odor Protection

Activated carbon filters eliminate odors through microscopic pores—but water fills these pores permanently.
Surface Dust Removal That Preserves Function
Use a sticky lint roller across both faces of the carbon filter to remove surface dust. Never apply water or cleaning solutions—this saturates the activated carbon and destroys its odor-absorbing properties within minutes.
Replacement Schedule Based on Your Environment
Cooking odors: Replace every 3 months
Pet households: Replace every 2 months
Smoke environments: Replace monthly
General use: Replace every 6 months
Safe Disposal Protocol After Replacement
Seal used carbon filters in a plastic bag before disposal—activated carbon can release absorbed chemicals if exposed to air. Check with your municipality about recycling options, as some facilities accept carbon filters for specialized processing.
Model-Specific Filter Cleaning Procedures That Work
Generic cleaning advice damages Bissell purifiers—follow these exact steps for your specific model.
Air220 Deep Cleaning Sequence
- Front grill: Pop release clips and wash with mild soapy water
- Pre-filter: Rinse weekly, replace annually
- HEPA filter: Vacuum monthly, replace every 6-12 months
- Carbon filter: Replace every 3-6 months based on odor levels
MyAir Personal Purifier Quick Service
- Foam pre-filter: Rinse monthly, replace every 3 months
- HEPA cartridge: Vacuum bi-weekly, replace annually
- Filter reset: Hold power button for 5 seconds after service
Smart Purifier Maintenance Workflow
The app tracks filter life automatically—clean the pre-filter when the app alerts you. After replacement, reset filter life through the settings menu under “Maintenance.” Never ignore persistent filter alerts as this voids your warranty.
Troubleshooting Common Filter Cleaning Problems
Fix these issues immediately after cleaning to restore full performance.
Weak Airflow After Filter Maintenance
Check that the HEPA filter’s airflow arrow matches the unit’s direction indicator. Ensure all seals are properly seated—gaps as small as 1/16 inch reduce efficiency by 20%. Verify the pre-filter is completely dry before installation.
Persistent Odors Following Carbon Filter Cleaning
This indicates carbon saturation—you cannot clean activated carbon filters. Replace immediately and wipe the housing interior with a damp microfiber cloth (never spray cleaners directly into the unit).
False Filter Alerts After Proper Cleaning
Reset indicators by holding the filter button for 5 seconds (Air320) or power button for 10 seconds (MyAir). If alerts persist, gently clean the sensor housing with a dry cotton swab—dust on the sensor triggers false readings.
Optimal Filter Maintenance Schedule by Household Type
Customize your cleaning frequency based on your specific environment.
Standard Home Maintenance Plan
- Weekly: Pre-filter rinse
- Monthly: HEPA vacuum cleaning
- Quarterly: Carbon filter replacement
- Annually: Full filter replacement
Pet Owner Adjustments That Prevent Clogging
Double your pre-filter cleaning frequency. Consider upgrading to a washable pre-filter designed for pet hair. Keep spare carbon filters on hand—replace them monthly during heavy shedding seasons.
Seasonal Adjustments for Peak Performance
Spring pollen season: Clean pre-filters twice weekly
Winter heating months: Extend carbon filter life by 25%
Wildfire smoke events: Replace all filters immediately afterward
Clean your Bissell air purifier filter every 2-4 weeks for optimal performance—this simple routine prevents costly repairs while ensuring your unit delivers hospital-grade air purification. Mark your calendar with model-specific reminders, and your Bissell purifier will maintain 99.7% particle capture efficiency for years. For persistent issues after proper cleaning, consult Bissell’s authorized service centers to preserve your warranty coverage.


