
Your Levoit air purifier silently battles dust, pollen, and pet dander to keep your indoor air fresh. But when those filters get clogged, your unit works harder while cleaning less effectively—leaving you with reduced airflow and compromised air quality. Knowing how to clean Levoit air purifier filter properly restores performance and extends filter life, but using the wrong method can permanently damage expensive HEPA media or void your warranty.
Most Levoit owners make the critical mistake of treating all filters the same, not realizing different filter types require completely different care approaches. This guide reveals the exact cleaning procedures for each Levoit filter type across multiple models, so you can maintain peak performance without costly errors. You’ll discover which filters can be cleaned versus replaced, step-by-step cleaning techniques that actually work, and how to establish a maintenance schedule that saves you money on premature replacements.
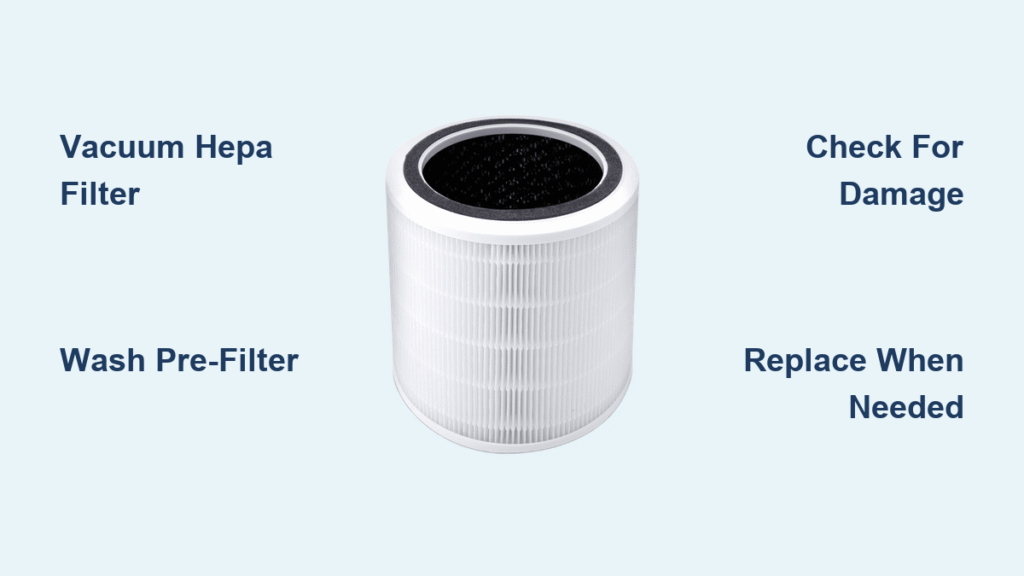
Identify Your Levoit Filter Types Before Cleaning

Opening your unit without knowing which filters you have is like performing surgery blindfolded—potentially disastrous. Different Levoit filter types have radically different cleaning requirements, and confusing them can ruin your entire filtration system.
HEPA Filter Cleaning Rules You Must Know
Your Levoit’s HEPA filter captures 99.97% of particles as small as 0.3 microns, but it’s also the most fragile component. Most Levoit HEPA filters cannot tolerate water exposure—check the filter frame for cleaning symbols where a crossed-out water droplet means absolutely no washing. Attempting to wash these filters collapses the delicate fiber matrix, creating permanent airflow channels that bypass filtration. For non-washable HEPA filters, gentle vacuuming is your only safe cleaning option to remove surface dust without damaging the media.
Pre-Filter Maintenance That Actually Works
The black mesh pre-filter serves as your first line of defense against larger particles like pet hair and dust bunnies. Unlike HEPA filters, most Levoit pre-filters are designed for regular cleaning—typically weekly vacuuming or gentle washing. These washable pre-filters usually have “washable” printed directly on the frame or packaging. Proper pre-filter maintenance prevents debris from reaching your expensive HEPA filter, effectively doubling its usable lifespan when done correctly.
Activated Carbon Filter Care Secrets
Levoit’s carbon filters absorb stubborn odors from cooking, pets, and chemicals, but they have limited cleaning potential. Once saturated, these filters can’t be effectively regenerated through home cleaning methods. If you notice returning odors after cleaning, it’s time for replacement rather than another cleaning attempt. Never wash carbon filters—moisture ruins their adsorption capacity and can create mold growth inside the filter media.
Essential Tools and Safety Setup for Filter Cleaning
Using improper tools during Levoit filter maintenance causes more damage than accumulated dust. The right equipment prevents accidental tears in delicate filter media while maximizing cleaning effectiveness.
Must-Have Cleaning Kit for Levoit Filters
- Soft-bristled vacuum attachment (never use stiff brushes)
- Microfiber cloths specifically labeled lint-free
- Handheld vacuum with adjustable suction control
- Mild dish soap only for washable pre-filters (no detergents)
- Clean, absorbent towels for drying
- Bright flashlight to inspect filter condition
Critical Safety Preparation Steps
Always power down and unplug your Levoit unit before filter access—never attempt maintenance while operational. Work outdoors or in a well-ventilated area as you’ll release concentrated allergens during cleaning. Wear a N95 mask if you have respiratory sensitivities, as dislodged particles can trigger reactions. Place a towel beneath your workspace to catch falling debris and protect your floors from dust clouds.
Core Series Filter Cleaning Process Revealed
Levoit’s popular Core series (300 and 400S models) shares similar filter configurations but requires different cleaning frequencies based on their room coverage capacities.
Core 300 Filter Access and Cleaning
Press both side tabs simultaneously to release the back cover, then slide the cylindrical filter assembly straight out. Carefully separate the outer pre-filter mesh from the main HEPA filter before cleaning. The Core 300’s compact design means its filters clog faster in pet households—clean the pre-filter weekly and vacuum the HEPA filter monthly for optimal performance in standard environments.
Core 400S Dual Filter System Maintenance
This larger model uses two distinct filter cartridges—mark their positions with tape before removal to ensure correct reinstallation. The pre-filters attach via Velcro strips; peel them gently to avoid tearing the fabric backing. Due to its higher CADR rating, the Core 400S requires less frequent cleaning than the Core 300 in equivalent spaces—vacuum the HEPA filters every 8-10 weeks under normal conditions.
LV Series Filter Maintenance Differences
Older Levoit LV models (H132 and PUR131) feature rectangular filters with unique access methods requiring special handling techniques.
LV-H132 Circular Filter Care Protocol
Twist the bottom cap counterclockwise to access the cylindrical filter stack. The outer pre-filter sleeve pulls off easily for separate cleaning. This model’s compact design means its filters require more frequent attention—clean the pre-filter every 10 days in homes with pets to prevent rapid HEPA saturation.
LV-PUR131 Side Access Method Explained
This model features side-mounted filters accessible through removable panels. The activated carbon filter sits sandwiched between two HEPA layers—handle with extreme care to maintain proper positioning. When reinstalling, ensure the carbon filter faces the correct direction as improper placement reduces odor removal efficiency by up to 40%.
Step-by-Step Filter Vacuuming Method That Works
Vacuuming properly removes surface debris without risking water damage to sensitive HEPA fibers—a technique applicable to all non-washable filter types across Levoit models.
Surface Debris Removal Technique
Hold the filter over a trash can and gently tap the frame to dislodge loose particles. Work systematically around all sides, focusing on visibly clogged sections. Use your flashlight to spot hidden dust pockets trapped between pleats—these reduce airflow without appearing on the surface.
Deep Vacuuming Without Damage
Set your vacuum to lowest suction setting and use the soft brush attachment. Work in straight lines across the filter surface—never scrub back-and-forth, as this damages the fiber structure. Vacuum both sides of pre-filters, but only the dirty side of HEPA filters to prevent pushing debris deeper into the media.
Edge and Crevice Cleaning for Maximum Effectiveness
Pay special attention to the filter frame edges where dust accumulates in hidden pockets. Use the crevice tool to clean between pleats without forcing the nozzle too deep—just 1/4 inch penetration is sufficient. This removes the “collar” of debris that forms at the pleat bases, restoring up to 15% additional airflow in heavily used units.
Washing Removable Pre-Filters Correctly
Only pre-filters explicitly marked as washable should be cleaned with water—attempting to wash HEPA or carbon filters destroys their functionality permanently.
Pre-Wash Inspection Checklist
Hold the pre-filter up to bright light before washing. If you see tears, holes, or permanent discoloration that doesn’t come out with vacuuming, replacement is necessary. Damaged pre-filters allow debris to bypass into the main filter, accelerating HEPA saturation. Check the frame for “washable” labeling—never assume based on appearance alone.
Gentle Washing Process That Preserves Filter Life
Fill a sink with lukewarm water (never hot) and add one drop of mild dish soap. Submerge the pre-filter and gently agitate for 30 seconds—vigorous scrubbing damages the mesh structure. Rinse under cool running water until completely clear, as soap residue attracts more dirt and creates sticky buildup.
Proper Drying Protocol to Prevent Mold
Lay the pre-filter flat on a clean towel and roll gently to remove excess water. Air dry completely for 24-48 hours in a well-ventilated area before reinstalling—never use hair dryers, radiators, or direct sunlight, as heat warps plastic frames and damages the mesh. Test dryness by touch; any moisture remaining can promote mold growth inside your purifier.
When Cleaning Won’t Fix Your Filter Problems
Certain filter conditions indicate replacement is necessary regardless of cleaning efforts—continuing to use them compromises air quality and strains your purifier motor.
Permanent Clogging Warning Signs
Persistent gray or black discoloration after thorough cleaning indicates the filter media is saturated beyond recovery. Musty odors that return within 24 hours of cleaning signal exhausted carbon filters that can no longer adsorb volatile compounds. These conditions require immediate replacement to maintain effective air purification.
Performance Testing After Cleaning
After maintenance, run your purifier on high for 10 minutes. Place your hand 6 inches from the output vent—if airflow feels significantly weaker than when new, the HEPA filter likely needs replacement. Compare current noise levels to when the unit was new; increased motor strain indicates restricted airflow from degraded filters.
Maintenance Schedule Based on Your Environment
Tailoring your cleaning frequency to actual usage prevents both premature filter replacement and degraded air quality from neglected maintenance.
High-Use Environment Protocol
Homes with multiple pets, smokers, or high allergy sufferers need pre-filter cleaning weekly and HEPA vacuuming every 3-4 weeks. During wildfire season or home renovations, check filters twice weekly as fine particulate matter rapidly saturates filter media. These environments typically require HEPA replacement every 6-8 months rather than the standard 12-month interval.
Moderate Use Household Schedule
Typical households benefit from pre-filter cleaning every 2-3 weeks and HEPA vacuuming every 6-8 weeks. Homes without pets can extend these intervals by 25%, but never exceed 3 months between HEPA maintenance sessions. Seasonal allergy sufferers should increase cleaning frequency during peak pollen months to maintain optimal performance.
Critical Filter Cleaning Mistakes That Ruin Levoit Filters
Understanding common errors prevents costly damage to your filtration system and ensures consistent air quality.
Vacuum Pressure Damage You Can’t See
Using full suction power or pressing the vacuum nozzle directly against filter media creates microscopic tears in HEPA fibers. These invisible damages create permanent airflow channels that bypass filtration, reducing effectiveness by up to 30% after just one aggressive cleaning session. Always maintain 1-inch separation between nozzle and filter surface.
Water Damage Scenarios That Require Replacement
Even brief water exposure to non-washable HEPA filters causes irreversible fiber clumping. If you accidentally wet a HEPA filter, replacement is the only safe option—drying won’t restore the original fiber structure. Water-damaged filters develop mold within 72 hours, contaminating your entire air purification system.
Reinstallation Errors That Reduce Effectiveness
Forcing filters back into position can damage seals and frames. Properly cleaned filters should slide in smoothly—resistance indicates misalignment. Always check for airflow direction arrows on the frame; installing filters backward reduces efficiency by 25-40% and strains the motor unnecessarily.
Regular filter maintenance keeps your Levoit purifier operating at peak efficiency while saving significant money on premature replacements. Focus on gentle vacuuming for HEPA filters and thorough washing of removable pre-filters, cleaning before performance noticeably declines. When cleaning no longer restores adequate airflow, replace filters promptly to maintain healthy indoor air quality. By following these precise techniques, you’ll maximize both your purifier’s lifespan and your household’s respiratory health.


