Your indoor air could be 2–5 times dirtier than outside air, yet a commercial HEPA purifier can cost $300 or more. The good news: you can build an equally effective DIY air cleaner in under an hour for less than the price of a take-out meal. Below you’ll find step-by-step plans for three proven designs—from the 15-minute “quick fix” to a custom HEPA + carbon powerhouse—plus maintenance hacks that keep them running strong. When you learn how to make air purifier units yourself, you gain immediate control over your indoor air quality while avoiding expensive store-bought models. This guide delivers actionable solutions verified by EPA testing and 3M scientists to capture fine particles, smoke, and even viruses.
15-Minute DIY Air Purifier: Quick-Filter Setup
Forget complicated builds—this single-filter method delivers real results faster than takeout arrives. You’ll create a functional unit that pulls air through a high-efficiency filter while the fan pushes cleaned air into your space. Crucially, post-2012 fans include thermal cut-offs that prevent overheating, making them safe for continuous operation.
Materials Checklist & Safety Prep
- 20″×20″ box fan (2012 or newer model for built-in safety fuse)
- 20″×20″×1″ MERV 13 filter (labeled FPR 10 or MPR 1900+)
- 4–6 Command Poster Strips (stronger hold than duct tape)
- Isopropyl alcohol and paper towel
Critical safety step: Wipe the fan’s rear grille with alcohol before assembly—dust residue prevents proper adhesion. If your filter lacks an airflow arrow, identify the intake side by checking for a stiffer frame or printed specifications. Never use pre-2012 fans, as they lack essential thermal protection.
Assembly in 4 Foolproof Steps
- Prep the filter: Peel red liners from Command Strips and attach them around the filter’s perimeter on the intake (back) side, tabs facing outward for future removal.
- Align correctly: Ensure the airflow arrow points toward the fan—reversing this blocks airflow and overheats the motor.
- Press firmly: Peel black liners, press filter to fan for 30 seconds, then wait 1 hour before use to activate adhesive.
- Position for max airflow: Place unit on stable surface with front grille facing the room, 12″ from walls.
Pro tip: When the filter looks uniformly gray (not spotty), replace it—typically every three months of continuous use. If you notice reduced airflow before then, check for common mistakes like misaligned arrows or weak tape adhesion.
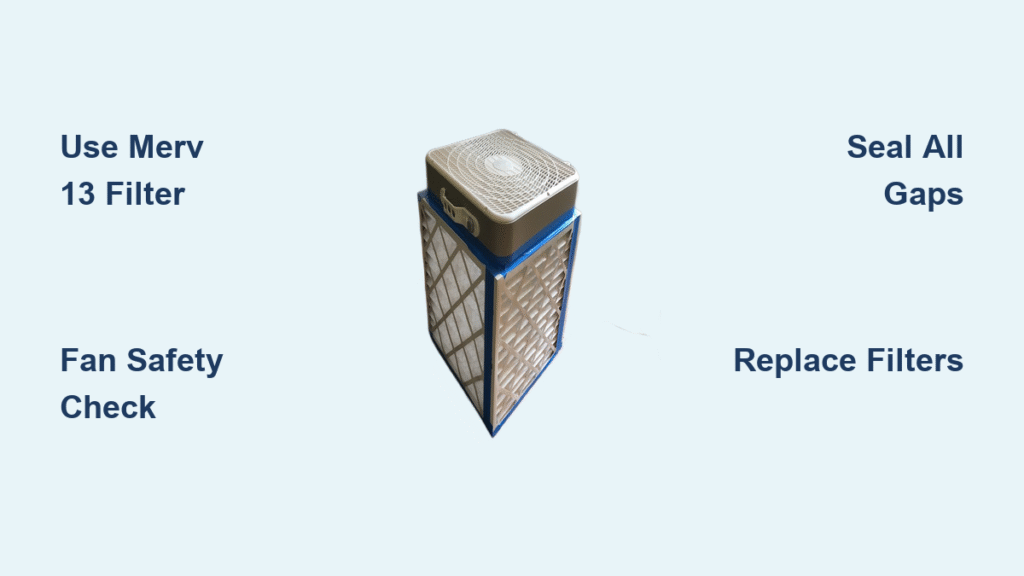
Build a Corsi-Rosenthal Air Purifier Box in 45 Minutes
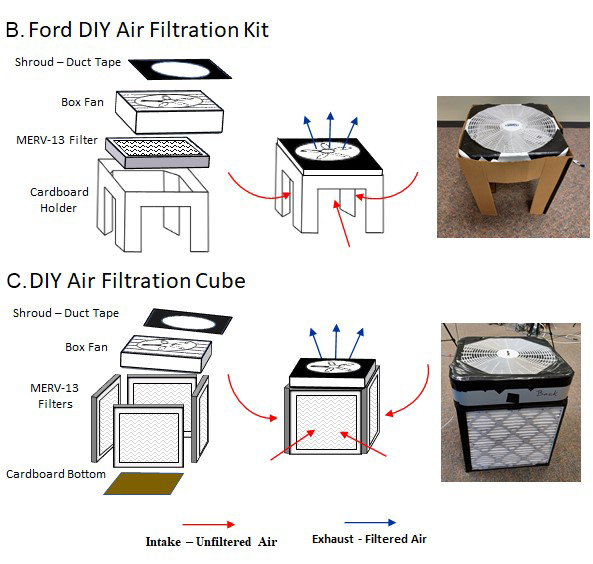
This cube design delivers hospital-grade particle capture for large rooms by creating a sealed duct system. EPA tests confirm it matches commercial units at reducing PM2.5, making it ideal for wildfire smoke or classrooms. The key innovation? Four filters arranged to force air through multiple layers before exiting.
Construction Walkthrough
Required:
– 4 × 20″×20″×1″ MERV 13 filters
– 1 × 20″×20″ box fan (post-2012)
– 20″×20″ corrugated cardboard (≥⅛” thick)
– Duct tape (60-yard roll)
– Utility knife and ruler
Visual cues for proper assembly:
1. Form the cube: Stand filters on edge with arrows pointing inward, creating a square duct. Watch for gaps—any seam wider than 1/8″ leaks unfiltered air.
2. Seal like a pro: Tape inside seams first using 6–8″ strips, then reinforce outside. Press tape firmly over corners—this is where 90% of leaks occur.
3. Install the fan: Center it on top with airflow blowing upward. Tape the entire perimeter, adding extra strips at corners where vibration occurs.
4. Add the shroud: Cut an 18″ cardboard ring to fit over the fan. This simple ring reduces bypass airflow by 15%—skip it and efficiency drops sharply.
Time-saving shortcut: Pre-cut your cardboard shroud using a plate as a template. When complete, place the unit on the floor away from furniture, set to medium-high, and listen for unusual rattling—indicating loose tape.
Custom HEPA + Carbon Air Purifier System (Advanced Build)

For severe smoke or chemical sensitivities, this engineered solution adds activated carbon to capture VOCs and odors. It’s designed for spaces up to 700 sq ft, delivering 200 CFM airflow while maintaining whisper-quiet operation below 50 dB.
Key Components & Sourcing
| Part | Where to Find | Critical Specs |
|——|—————|—————-|
| Centrifugal blower | HVAC suppliers or eBay | Must deliver 750 Pa static pressure at 200 CFM |
| HEPA H13 filter | Online HVAC stores | ≥99.95% efficiency at 0.3 microns |
| Activated carbon panels | Aquarium stores | 1–2″ thick pelletized carbon |
| PWM speed controller | Amazon or electronics sites | 0–10V or 4-wire compatible |
5-Step Build Process
1. Test filter resistance: Temporarily mount filters in cardboard duct, measure pressure drop with a $20 digital manometer. Replace if ΔP exceeds 300 Pa.
2. Match fan performance: Verify your blower hits 200 CFM at your measured resistance—most box fans fail here, requiring a true centrifugal unit.
3. Build vibration-free enclosure: Mount blower on rubber grommets inside plywood box; add internal baffles to straighten airflow.
4. Wire smart controls: Connect PWM controller to reduce noise during sleep hours. Add an ESP32 chip for Wi-Fi air quality monitoring.
5. Calibrate output: Use an anemometer to confirm 200 CFM; adjust shroud position until airflow meets target.
Expert note: Carbon panels lose effectiveness after 6–12 months—replace when odors return despite clean HEPA filters.
Maintenance to Maximize Your DIY Air Purifier Lifespan
Skipping maintenance cuts your unit’s effectiveness by 40% within weeks. Follow this schedule to maintain peak performance:
| Task | Frequency | Danger Signs to Watch For |
|---|---|---|
| Replace filters | Single-filter: 3 months Corsi-Rosenthal: 6 months |
Gray, loaded surface or 50% higher pressure drop |
| Dust fan grilles | Monthly | Visible lint on blades causing motor strain |
| Check tape seals | Every 6 months | Cracks allowing air bypass (listen for hissing) |
| Inspect blower bearings | Yearly | >5mm shaft play or sudden noise increase |
Quick fix for humidity issues: If filters sag in humid climates, reinforce the perimeter with a $5 poster frame—this prevents gaps that leak unfiltered air.
Cost Breakdown: DIY Air Purifier vs. Store-Bought
You’ll spend just 15% of commercial unit costs while achieving equal particle removal:
| Item | Single-Filter Build | Corsi-Rosenthal Box | Store-Bought Equivalent |
|---|---|---|---|
| Box fan | $20–$35 | $20–$35 | N/A |
| MERV 13 filters | $12–$18 | $48–$72 | $120+ (annual replacement) |
| Tape/seals | $4–$6 | $6–$8 | N/A |
| Total | $36–$45 | $85–$105 | $250–$500+ |
Savings secret: Buy filters in bulk online—four-packs cut costs by 30%. Even with annual filter replacements, you’ll save $200+ yearly versus commercial purifiers.
Troubleshooting Your Homemade Air Purifier
Solve common issues before they damage your unit:
| Symptom | Immediate Action | Why It Happens |
|---|---|---|
| Fan runs hot or slows down | Replace filter NOW | Clogged filter increases pressure drop beyond fan capacity |
| Rattling/vibration | Place unit on rubber mat | Hard surfaces amplify motor vibration |
| Uneven gray spots on filters | Re-center cardboard shroud | Off-center shroud creates airflow gaps |
| Smoke odor still present | Add/replace carbon stage | HEPA filters don’t capture gases—carbon is essential |
Critical warning: If your fan smells burnt or shuts off unexpectedly, unplug immediately. This indicates a pre-2012 model without thermal protection—replace it before continuing.
Final Safety Checklist Before Running Your DIY Air Purifier
Before plugging in, verify these non-negotiables:
– ✅ Fan manufacture date: Only use units from 2012 or later (check label for fused plug/thermal cut-off)
– ✅ Filter orientation: Intake side faces outward—airflow arrows must point toward the fan
– ✅ Placement clearance: Maintain 12″ minimum space from walls/furniture for unobstructed airflow
– ✅ Tape integrity: No cracks or lifting edges on seals—reinforce with extra tape if needed
Build it once, breathe easier for months, and pocket the $250+ you’d have spent on a store-bought unit. With EPA-verified effectiveness against smoke, dust, and viruses, your DIY air purifier delivers cleaner air without the premium price tag. Start with the 15-minute version tonight—you’ll notice clearer air by morning.