
Your Honeywell air purifier silently battles dust, pollen, and pollutants in your home—until it’s time for filter changes. When that front grille refuses to budge or the housing seems permanently fused, you’re not alone. Thousands of owners struggle with Honeywell’s model-specific opening mechanisms, risking broken clips or voided warranties with improper techniques. This guide delivers precise, model-by-model instructions to safely access filters and internal components. You’ll learn exactly where to press, twist, or slide based on your unit’s series—whether it’s a countertop HHT model or a tower HFD unit—ensuring correct reassembly and optimal air cleaning performance.
Knowing how to open your Honeywell air purifier correctly transforms frustrating maintenance into a 3-minute routine. Skip the guesswork that cracks plastic housings or misaligns critical seals. In the next sections, you’ll master the exact pressure points and sequences for your specific model while avoiding the top 3 mistakes that trigger costly repairs.
Power Down and Safety Protocols
Before touching a single clip or screw, complete these non-negotiable safety steps to protect yourself and your unit. Skipping these risks electrical shock, filter contamination, or accidental warranty voidance.
Complete Power Disconnection
Unplug your unit directly from the wall outlet—not a power strip—and wait 60 seconds. This critical pause allows internal capacitors to discharge residual electricity. Never attempt opening while the unit shows power indicator lights, as shock risks remain even when “off.” Verify safety by pressing the power button; no response confirms full discharge.
Filter Contamination Handling
Wear nitrile gloves when removing used filters. Trapped HEPA particles include allergens, mold spores, and bacteria that become airborne during handling. Immediately seal old filters in double plastic bags before disposal. If your model includes a UV-C light chamber, avoid direct eye exposure to the bulb—turn it away from you during removal.
Warranty Seal Verification
Run your fingers along all housing seams to locate warranty stickers, typically thin translucent labels over screws or clips. These tamper-evident seals appear near base screws on QuietCare models or along tower seams on HFD series. Breaking them invalidates coverage—photograph intact seals before proceeding as proof of careful handling.
Model-Specific Opening Tools
Using incorrect tools scratches housings or strips screws. Match your Honeywell series to this tool checklist before starting.
Universal Tool Kit
- #1 Phillips screwdriver (for 90% of base screws)
- Plastic pry tools (prevents scuffing on grille edges)
- Needle-nose pliers (grips stubborn internal clips)
- Microfiber cloth (wipes fingerprints during reassembly)
Series-Specific Essentials
- HPA300 models: Torx T15 driver for security screws
- HFD tower units: Rubber grip pad (for twist-lock rotation)
- HHT compact purifiers: Precision flathead (releases rear panel latches)
Store screws in a magnetic tray labeled with position (e.g., “front-left base”). Losing even one can misalign housing during reassembly.
HPA Series Front Grille Access
HPA100/200/300 models hide release points under deceptive smooth surfaces. Apply pressure exactly where specified to avoid cracking brittle plastic.
Thumb Tab Release Technique
Kneel to view the grille base at eye level. Locate two recessed thumb tabs 2 inches from each bottom corner. Press both inward ¼ inch with thumb pads while simultaneously pulling the grille toward you. If resistance persists, tap the grille’s top edge downward with your palm—this releases hinge clips. Stop immediately if you hear cracking sounds.
Pre-Filter Panel Removal
After grille removal, grasp the pre-filter frame’s bottom lip. Lift straight up 2 inches until the top tabs clear their slots—never tilt sideways. Note the airflow arrow stamped on the filter’s edge; reinstall with this pointing toward the back grille. A misaligned pre-filter reduces suction by 25%.
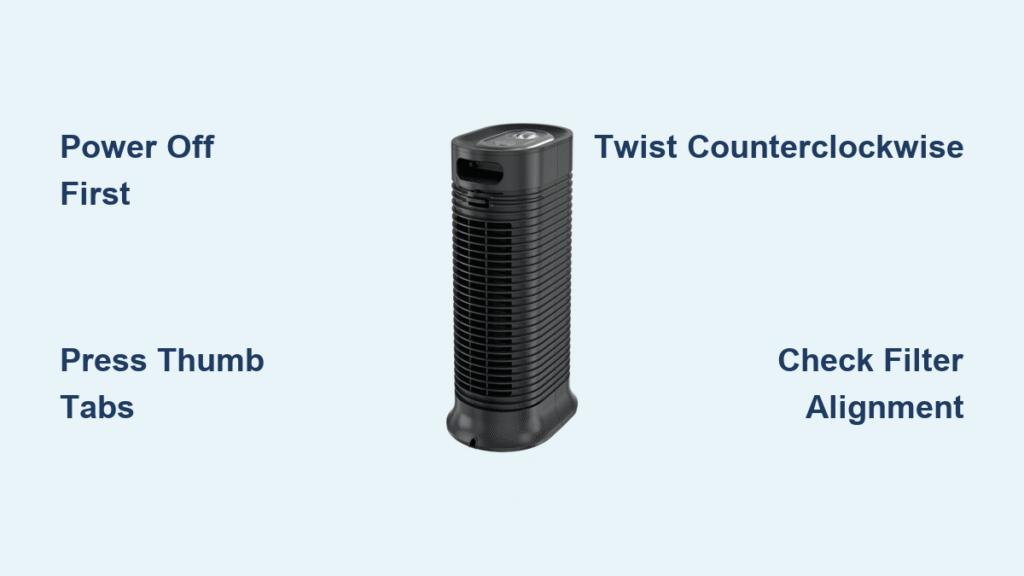
HFD Tower Twist-Lock Opening
HFD-120/320 towers require precise rotational force. Guessing the unlock direction strips internal cams.
Lock Position Identification
Find the twin arrow indicators on the front seam near the base. These show the unlock rotation path—a 45-degree counterclockwise turn from the “locked” position (arrows aligned vertically). Place tape markers on both arrows pre-rotation to verify movement.
Controlled Housing Separation
Press down firmly on the top housing with your palms while rotating counterclockwise. Apply steady pressure until you feel a distinct click (usually at 30-45 degrees). Lift the top section straight up—any side-to-side motion strains the fan motor wiring harness. If stuck, warm the seam with a hairdryer for 20 seconds to loosen adhesive residue.
HHT Compact Model Rear Access

HHT-011/080 units use sliding panels that bind when dust accumulates. Force causes rail breakage.
Panel Release Sequence
Slide your fingernail into the 1/8-inch gap at the panel’s top-right edge. Push the panel upward ¼ inch until it clears the top latch, then pull straight back. If stuck, insert a plastic tool at the gap and gently twist to release the lower clip. Never pry from the bottom—that snaps retention tabs.
Battery Compartment Access
After panel removal, locate the rectangular battery cover in the upper-right quadrant. Press its left-edge tab inward while sliding the cover toward you. If your unit lacks batteries, this space houses wiring harnesses—avoid touching exposed connectors.
Troubleshooting Seized Mechanisms

Stuck components often result from dust cementation or age-hardened plastics. Apply these fixes before forcing parts.
Dealing with Glued Grilles
For HPA series with fused grilles, apply isopropyl alcohol to cotton swabs and work it along the seam. Wait 5 minutes for the alcohol to soften adhesive residue, then retry the thumb-tab technique. Never use acetone—it melts ABS plastic housings.
Stripped Screw Recovery
For rounded-out screws, place a wide rubber band between the screwdriver tip and screw head. The band fills stripped grooves, providing grip for removal. If ineffective, drill a shallow pilot hole and use a screw extractor—reserve this for last-resort scenarios.
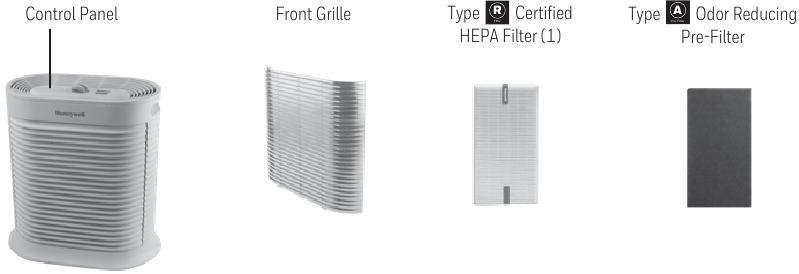
Filter Installation Verification
Correct filter seating prevents air bypass that cripples performance. Verify these critical points before closing.
HEPA Orientation Check
All Honeywell HEPA filters have molded airflow arrows. Install with arrows pointing toward the fan intake (typically upward in HPA models, rearward in HFD towers). Reversing this reduces particle capture efficiency by 40%. Gently tug the filter after insertion—it should resist removal with firm pressure.
Carbon Filter Placement
Multi-stage models require carbon filters between pre-filter and HEPA. Position the carbon filter with its mesh side facing the pre-filter and solid backing toward the HEPA. A misplaced carbon layer creates air gaps that allow unfiltered air leakage.
Post-Opening Seal Validation
A single misaligned gasket compromises your entire air purification cycle. Complete these checks before powering on.
Airflow Integrity Test
With all filters installed but housing open, run the unit on high speed. Hold a tissue 6 inches from the intake grille—it should pull firmly against the surface. Weak suction indicates filter misalignment or housing gaps.
Vibration Noise Screening
Operate the unit for 3 minutes post-reassembly. Any rhythmic buzzing suggests loose screws or unseated filters. Immediately power down and recheck all latches—ignoring vibrations accelerates motor bearing wear.
Model-Specific Maintenance Timelines
Opening frequency varies drastically by model and usage. Stick to these schedules to avoid premature wear.
HPA Series Critical Intervals
- Monthly: Clean pre-filter (rinse under lukewarm water)
- Every 6 months: Full housing opening for HEPA replacement
- Yearly: Motor housing vacuuming (use brush attachment)
Tower Model Deep Cleaning
HFD units require bi-annual fan blade cleaning. After opening, use a microfiber cloth wrapped around a chopstick to wipe blades—never spin blades manually. Skip this, and dust buildup creates imbalance noise within 4 months.
Opening your Honeywell air purifier correctly takes just 90 seconds once you know your model’s secrets. Always document screw positions with photos during disassembly, and never force components that resist—90% of “stuck” housings yield with the precise pressure points covered here. By maintaining proper seals and filter orientation, you’ll extend your unit’s lifespan by 3+ years while ensuring hospital-grade air purification. For ongoing maintenance, bookmark Honeywell’s filter replacement calculator on their official site—it inputs your model number to generate personalized change reminders.


