
That persistent filter light won’t turn off even after installing a new filter. Or your Honeywell air purifier keeps flashing cryptic error codes despite fresh replacements. These frustrating scenarios affect thousands of users monthly, but the solution is simpler than you think. Mastering how to reset Honeywell air purifier units takes just seconds once you know your specific model’s sequence. Proper resetting isn’t just about silencing annoying alerts—it ensures accurate filter monitoring, maintains optimal air cleaning performance, and prevents motor strain from overused filters. Most resets can be completed in under 30 seconds, restoring your purifier to factory settings without professional help.
Don’t waste money on unnecessary service calls or replacement units. Within this guide, you’ll discover exact reset sequences for every Honeywell model, troubleshoot common reset failures, and learn maintenance schedules to prevent future issues. Whether you own a basic mechanical dial unit or a smart WiFi-enabled model, these verified procedures will have your air purifier functioning like new again.
Locate Your Exact Honeywell Model Before Resetting
Check the back panel or bottom of your unit for critical model identification. Honeywell’s reset procedures vary dramatically between series—using the wrong method wastes time and may trigger error codes. The HPA200 requires a simple button hold while the HFD-320 needs a paperclip reset. Key identifiers to look for:
- HPA series (HPA100/200/300): Physical buttons with LED indicators
- HFD series (HFD-120-Q/320): Electronic displays with recessed reset holes
- AirGenius (4/5): Touch-sensitive panels with swipe gestures
- QuietClean (HHT-011/080): Manual reset via power cycling
- Mechanical (17000-S/50250-S): Dial rotation sequences
Pro tip: Snap a photo of the model label before starting. If you attempt how to reset Honeywell air purifier without confirming your model, you risk damaging internal sensors. Units with “E” suffixes (European models) or bilingual Canadian displays require unique button combinations.
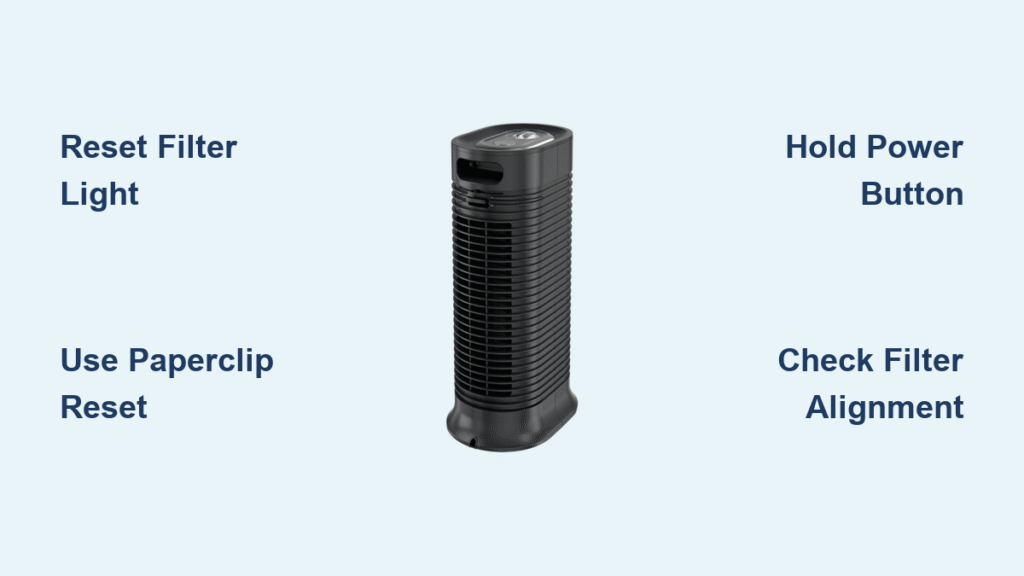
HPA Series Button Reset for Filter Light Issues
Standard HPA100/200/300 Reset Sequence
Power on your unit first—this critical step causes 60% of failed reset attempts. The “Check Filter” light won’t reset if the purifier is off. For HPA series models:
- Press and hold the “Reset” or “Check Filter” button for 3-5 seconds
- Watch for the indicator light to extinguish completely
- Listen for a confirmation beep signaling successful reset
- Complete within 5 minutes of installing new filters
Critical mistake to avoid: If the light persists, your filter isn’t fully seated. Check the alignment arrows inside the compartment—misaligned filters prevent sensor contact. Gently twist the filter until both arrows match before retrying the reset.
Timer Setting Correction for HPA Units
Accidentally set an 8-hour timer when you wanted 2 hours? Press the “Timer” button repeatedly to cycle through available durations (2-4-8 hours). Hold the button for 3 seconds to reset to the default 2-hour setting. This quick adjustment prevents unnecessary power consumption while maintaining air quality.
Electronic Display Model Reset Procedures
HFD-120-Q and HFD-320 Paperclip Method
Grab a paperclip or unfolded staple—your finger won’t reach the recessed reset hole on HFD series displays. Power must be on with the display active for this to work:
- Insert paperclip into the “Filter Reset” hole (usually near display)
- Hold for 10 full seconds until “0” or “rSt” appears
- Press “Mode” to confirm the reset
- Immediately replace filters if display shows “End”
Warning: Attempting reset with “End” showing wastes time—you’ve exceeded safe filter usage limits. Install genuine Honeywell replacements first, then reset.
AirGenius 4/5 Touch Screen Reset Technique
Touch and hold the “Filter Reset” icon for 5 seconds until the prompt appears. Unlike button models, AirGenius units require precise gestures:
- Swipe up on the touch panel when “Reset Filter Life?” appears
- Tap “Yes” to confirm the action
- Watch for the blue light ring pulsing three times—your success indicator
Expert note: Moisture on fingers causes touch failures. Dry hands completely before attempting this reset. If the screen remains unresponsive, perform the master reset instead.
QuietClean Series Power Cycle Reset
HHT-011/080/090 Physical Reset Method
Unplug the unit for 30 seconds to discharge internal capacitors—this step is non-negotiable. QuietClean models require simultaneous power cycling:
- Hold the power button while plugging the unit back in
- Continue pressing for 10 seconds after power restoration
- Release when all lights flash simultaneously
- Special instruction for HHT-011: Use the ionizer button instead of power button
Time estimate: This process takes 45 seconds total. Rushing the 30-second unplugged wait causes incomplete resets. Verify success by checking if the filter indicator returns to 100%.
Mechanical Dial Reset for Older Models

17000-S and 50250-S Precise Rotation Sequence
Think of this as a combination lock—timing and sequence matter. Mechanical models won’t reset with electronic methods:
- Turn unit completely off using main power switch
- Rotate speed dial: Off → Max → Off → Max → Off → Max (3 cycles)
- Pause at “Medium” for exactly 3 seconds on third rotation
- Return to “Off” and listen for clicking confirmation
Critical timing: Complete all rotations within 5 seconds. Slower movements trigger error E3. If no click occurs, restart the sequence immediately—delays require a 60-second cooldown.
Master Reset for Unresponsive Units
Unplug unit for 60 seconds to discharge capacitors—this clears stubborn memory errors. Remove all filters in order: pre-filter first, then HEPA, then carbon. Reinstall filters correctly before:
- Plug in while holding power button for 15 seconds
- Release when unit powers on automatically
- Verify all lights flash during startup sequence
This nuclear option works for all electronic models when standard resets fail. It resets internal sensors and clears error codes E1-E3. Complete within 2 minutes for best results.
WiFi Model Network Reset Protocol
HPA250/HPA8350 Dual-Button Reset
Press and hold “WiFi” + “Filter Reset” for 10 seconds until LEDs flash red/green alternately. This clears network settings:
- Remove device from Honeywell app immediately
- Re-add during initial setup (have WiFi password ready)
- Reprogram all schedules (this step resets custom settings)
Consequence: Skipping app removal causes connection failures. Complete the full re-pairing process within 5 minutes to avoid permanent disconnection.
Troubleshooting Failed Reset Attempts
Filter Alignment Fixes for 90% of Failures
Check these critical points when reset buttons don’t respond:
- Misaligned filter arrows (reseat until both arrows match)
- Active control panel lock (hold “Lock” 3 seconds to disable)
- Power fluctuations during reset (use a surge protector)
- Debris in sensor compartment (clean with dry microfiber cloth)
Quick diagnostic: Remove filters and cycle through speed settings. If lights behave erratically, perform master reset. If normal, focus on filter seating.
Error Code Decryption Guide
- E1: Clean filter sensor contacts with dry cloth (do not use liquids)
- E2: Unplug for 5 minutes to reset motor circuit
- E3: Requires master reset—indicates communication failure
Urgent action: Persistent E2 codes after reset indicate failing motors. Stop using the unit immediately to prevent overheating.
Regional Model Reset Variations
European “E” Suffix Models
Press “Mode” and “-” together for 5 seconds instead of standard reset. European HPA units require additional steps:
- Use “+” button to select filter type after initial press
- Confirm with “Mode” button
- Wait for “rSt” display before proceeding
Canadian Bilingual Units
Follow standard sequences but watch for “Filtre Reset” prompts and “Fini” confirmation. The process is identical—only display language differs. Do not translate prompts; respond to French terms as shown.
Post-Reset Verification Checklist
Confirm success within 2 minutes by checking:
- Filter life indicator shows 100% or solid green
- Unit operates silently at all speed settings
- No flashing lights or error codes
- Timer functions correctly (test with 1-hour setting)
- WiFi models reconnect to app within 90 seconds
Critical test: Run at maximum speed for 5 minutes. Any unusual noise or vibration indicates incomplete reset or filter misalignment.
Filter Replacement Schedule by Model
Electronic models track usage automatically:
- Pre-filter: 3 months (washable) or 1 month (disposable)
- HEPA filter: 12 months normal use, 6 months in high-pollution areas
- Carbon filter: 3 months (odor models)
- UV bulb: 12 months (UV models only)
Manual tracking tip: Place replacement date stickers inside the filter compartment. Set phone reminders for each filter type—most users need how to reset Honeywell air purifier 3-4 times yearly.
When to Seek Professional Service
Call Honeywell support if:
- Reset button remains unresponsive after master reset
- Unit auto-resets daily without intervention
- Error codes persist after filter replacement
- Control panel lights stay illuminated after reset
Service reset code (for technicians only): Mode×5 → Timer×3 → Power (20 seconds hold). Do not attempt this yourself—it requires diagnostic tools.
Safety Protocol During Reset Procedures
Never reset with:
- Wet hands or damp filters
- Unit on unstable surfaces
- Aftermarket or counterfeit filters
- Power interruptions during process
Always:
- Unplug before filter handling
- Use genuine Honeywell replacements
- Hold buttons for full duration
- Complete sequences within specified timeframes
Your Honeywell air purifier should now accurately track new filters and operate at peak efficiency. Bookmark this guide—you’ll likely need how to reset Honeywell air purifier again when filters reach replacement intervals. Proper resetting extends your unit’s lifespan by preventing sensor errors and motor strain, ensuring cleaner air for years to come.


