
Your sneezing fits won’t stop, the baby’s crib smells like the dog, and your “allergies” now last year-round. You bought a HEPA air purifier expecting relief, but if it’s not used correctly, you’re only capturing a fraction of airborne threats. The truth? A properly operated HEPA unit removes 99.97% of particles as small as 0.3 microns—but one wrong step slashes its effectiveness by 30% or more. Most owners make critical errors within the first week: installing filters backward, shoving units into corners, or ignoring replacement schedules. These mistakes turn your $300 investment into a noisy paperweight. What if you could transform your air quality in just 20 minutes by fixing these issues? This guide reveals the exact hospital-grade protocols for using your HEPA air purifier to its full potential.
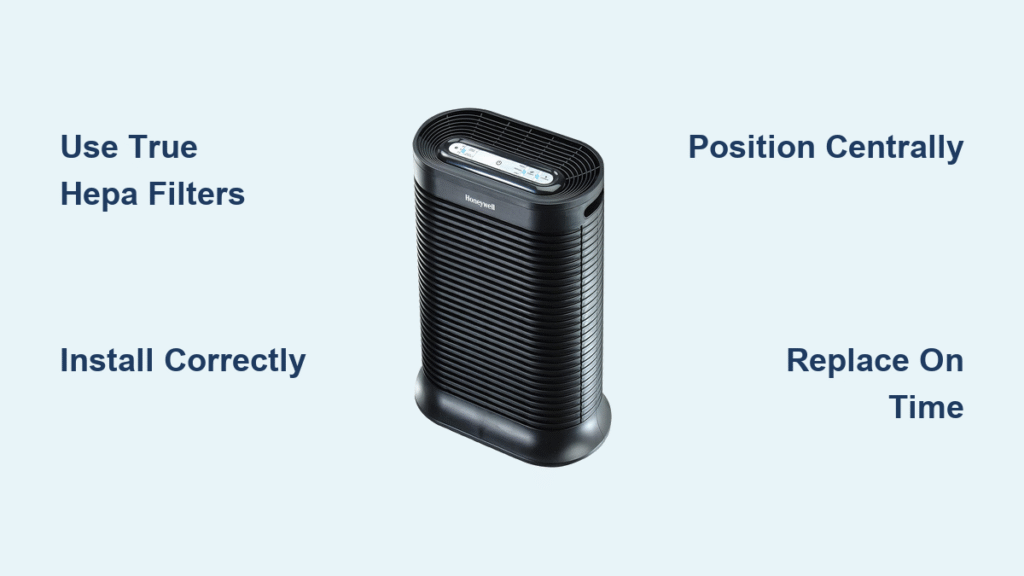
Select Certified True HEPA Filters to Block 99.97% of Particles
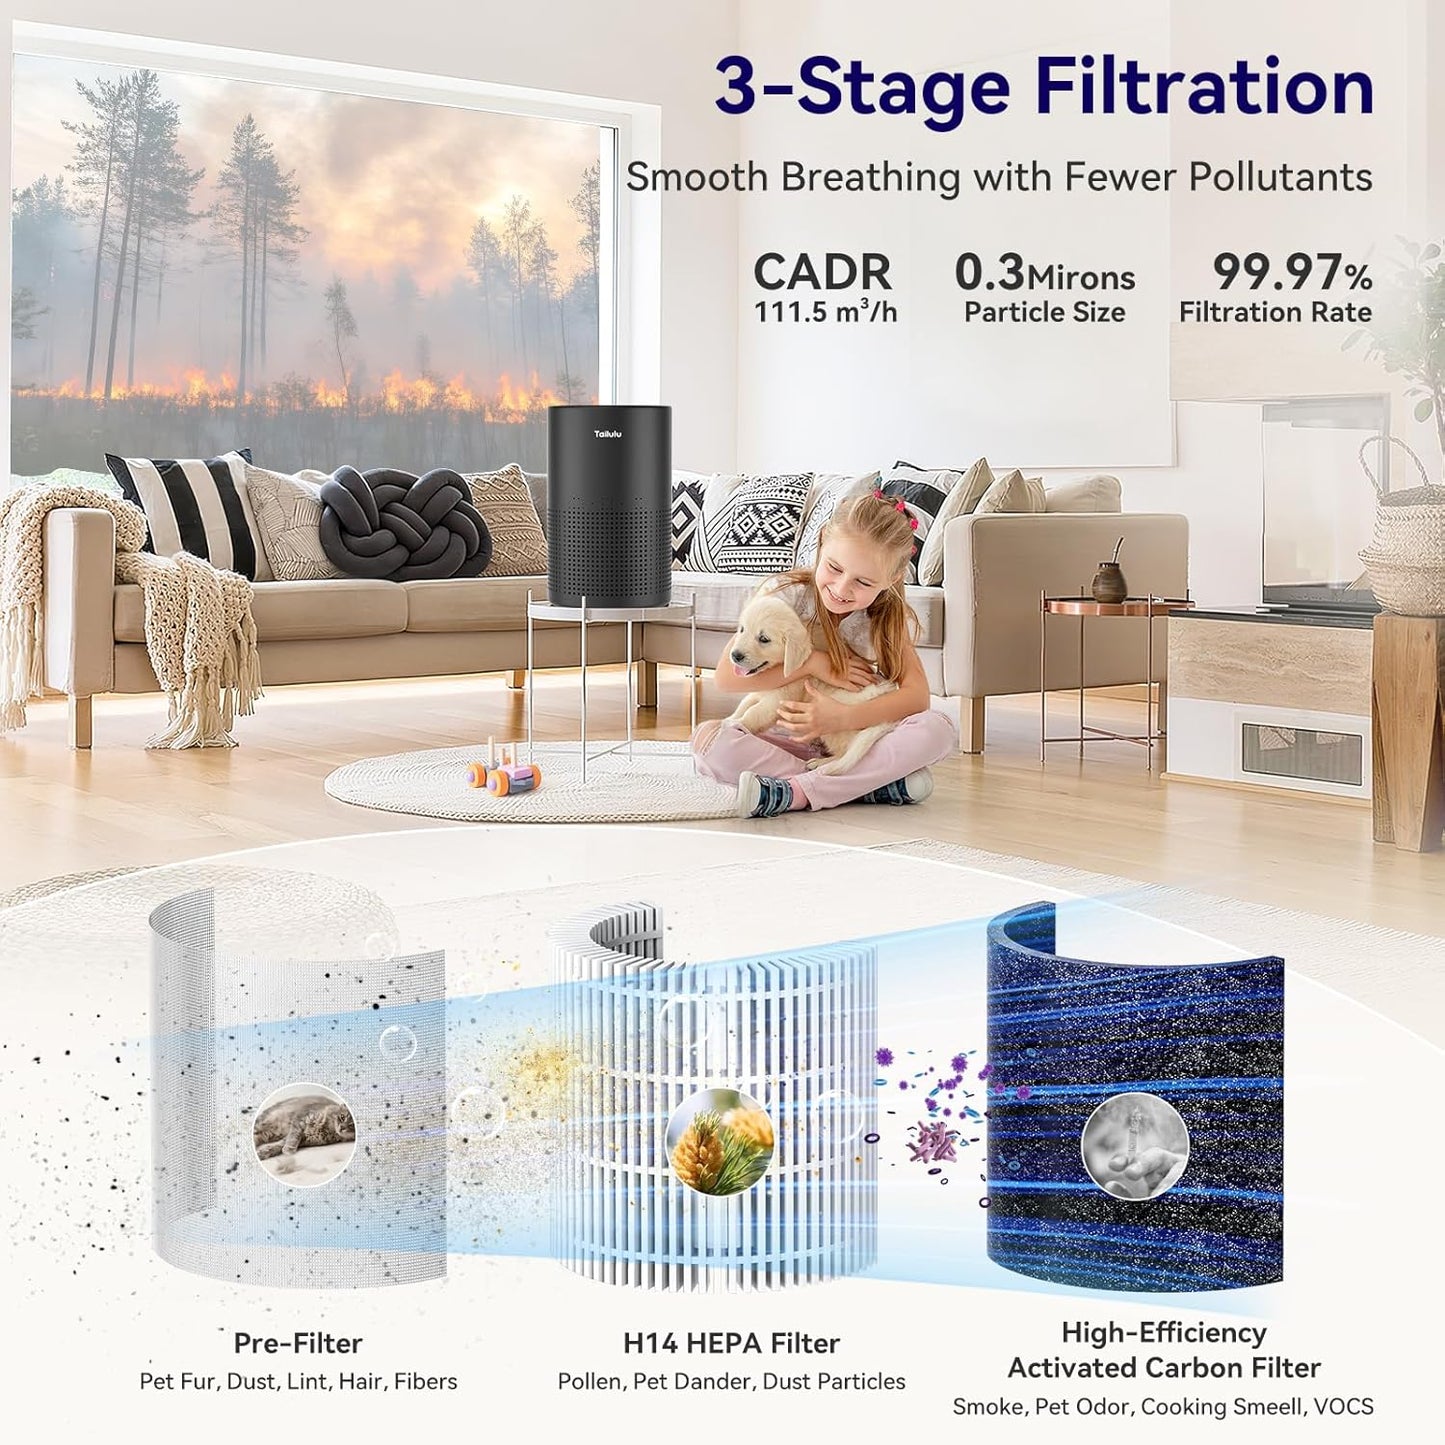
Skip marketing fluff that promises “HEPA-like” performance. True HEPA filters must capture 99.97% of 0.3-micron particles—the most penetrating size that evades lesser filters. Anything labeled “HEPA-style” or “99% HEPA” leaks 30× more particles, making your allergies worse. Always verify “True HEPA” certification or European H11-H14 grading on the packaging. Match your filter grade to your specific needs: H11-H12 works for general homes, while H13-H14 is essential for severe allergies or asthma. Before purchasing, check the filter frame for airflow arrows—cheap knockoffs often print them backward, guaranteeing immediate 30% efficiency loss. Pro tip: Medical-grade H13-H14 filters capture bacteria and virus-laden droplets, making them critical for immunocompromised households.
Avoid These 3 False HEPA Labels
- “HEPA-type”: Typically captures only 85-90% of particles
- “99% HEPA”: Fails the 0.3-micron standard by 29.97%
- “HEPA-inspired”: Marketing jargon with no certification
Install Your HEPA Filter in 7 Steps (Avoid 30% Efficiency Loss)

Power down your unit completely before starting—never work on a live electrical device. Locate the filter bay by removing the front panel (usually a pop-off or slide mechanism). Pull the old filter straight out, noting disposal rules if it’s a medical-grade unit. Here’s where 60% of users fail: dry-fit the new filter with the airflow arrows pointing toward the motor. Glass microfibers only trap particles when oriented correctly. Press firmly until you feel the gasket seal—no light should leak through gaps. Close the panel until the safety switch clicks (units won’t operate with doors ajar). Finally, reset the filter-life indicator by holding the button for 3-5 seconds. Critical warning: Installing filters backward causes rapid clogging and 30-50% efficiency loss—double-check arrows before sealing.
Position for Maximum Airflow: 3 Critical Clearance Rules
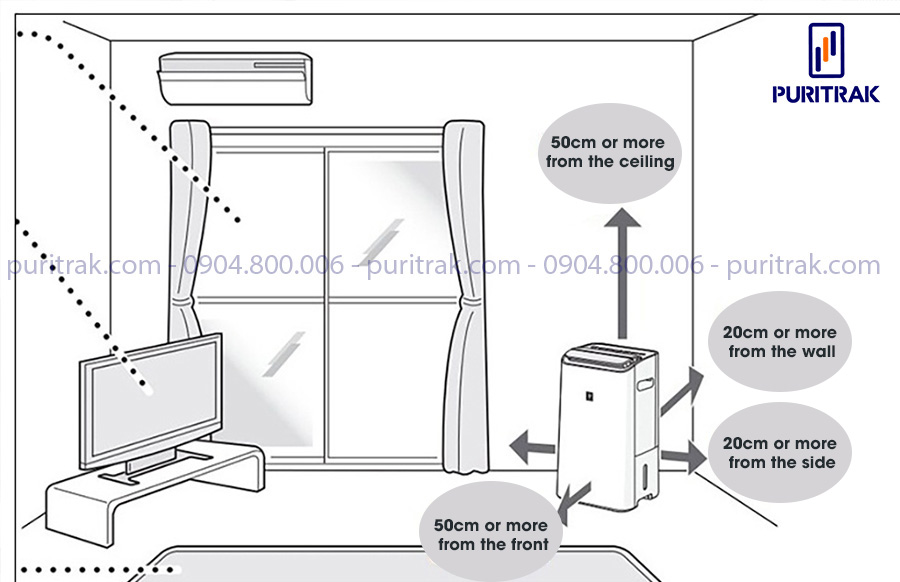
Place your HEPA air purifier centrally at 3-5 feet high—coffee table or dresser height creates optimal circulation. This positioning captures pollutants before they settle on surfaces. Maintain strict 2-foot clearance from all obstacles: walls create dead zones, curtains block 60% of intake, and heat-generating electronics like TVs strain the motor. In bedrooms, position 6 feet from the headboard on the opposite wall to intercept allergens drifting toward pillows. Never tuck units into corners—this reduces effective coverage by 40%. For kitchens, place within 10 feet of cooking surfaces to capture smoke particles before they disperse. Bedroom hack: Run the unit 30 minutes before sleep with doors closed to create a clean-air sanctuary.
Set Fan Speeds for Allergies, Cooking, and Sleep: A Proven Chart
Adjust speeds strategically using this evidence-based chart from CDC ventilation guidelines. During normal occupancy, use Auto or Medium mode continuously—this maintains 5 air changes per hour (ACH), the threshold for noticeable air quality improvement. When cooking or vacuuming, switch to High for 30-60 minutes to capture smoke and stirred-up dust. At night, activate Sleep/Low mode for noise reduction below 25 dB. Energy-saving trick: Use the 2-hour timer after cleaning instead of running High all night—this cuts energy use by 60% while maintaining effectiveness. Never run Low speed 24/7 in large rooms; inadequate ACH leaves particles circulating. Pro tip: Smart models with air-quality sensors automatically ramp up when PM2.5 spikes—worth the upgrade for pet owners.
| Situation | Speed Setting | Duration | Why It Works |
|---|---|---|---|
| Daily use | Auto/Medium | Continuous | Maintains 5+ ACH for baseline cleanliness |
| Cooking/cleaning | High | 30-60 min | Captures 99% of smoke particles before settling |
| Nighttime | Sleep/Low | 6-8 hours | Quiet operation without sacrificing particle removal |
Replace HEPA Filters on Time: 3 Visual Signs You Can’t Ignore
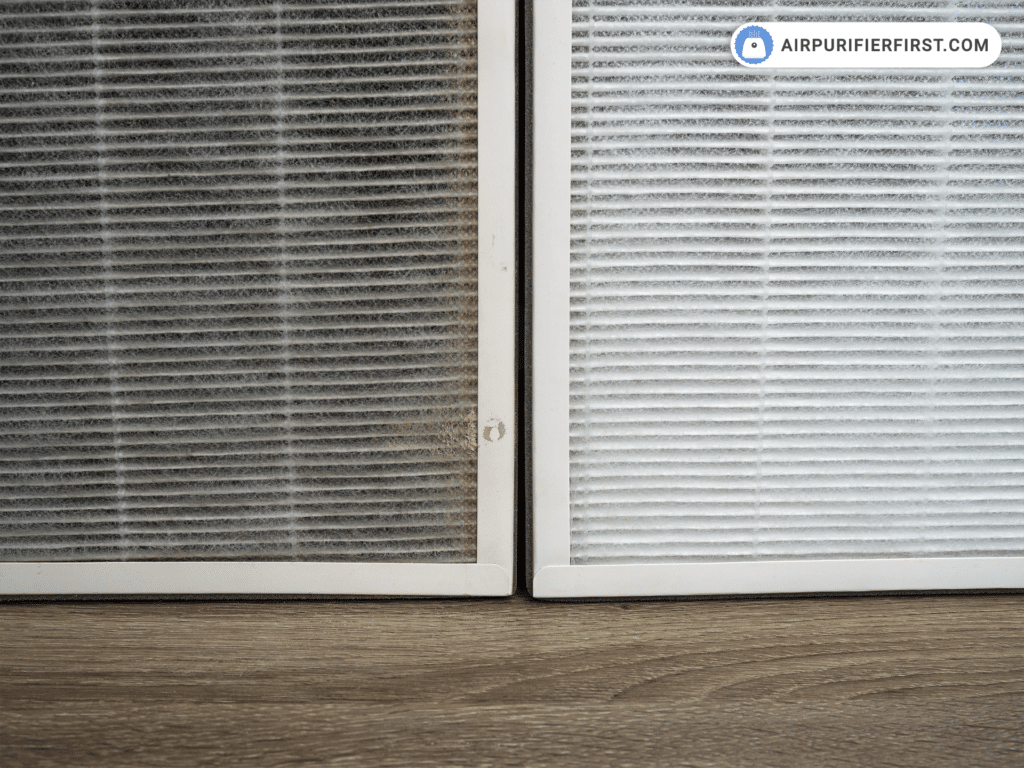
Don’t wait for indicator lights—inspect filters monthly for gray discoloration spreading across the media. This “dust cake” signals saturation, especially near the intake side. Reduced airflow from vents and returning musty odors are red flags you’ve passed the replacement window. Follow these evidence-based timelines: average homes need changes every 8-12 months, pet owners every 4-6 months, and smokers every 3-4 months. Critical warning: Never wash HEPA filters—water destroys the glass fiber matrix and voids warranties. Store spares sealed in original packaging in dry, climate-controlled areas (15-25°C, <60% humidity) to prevent pre-loading with dust. Pro tip: When replacing, vacuum the empty filter bay to prevent debris from hitting the new media.
Boost Purifier Effectiveness 40%: 4 CDC-Backed Tactics
Combine these scientifically proven tactics to maximize your HEPA air purifier’s impact. First, vacuum with a sealed HEPA shop-vac before running your unit—this removes settled dust that would otherwise re-aerosolize. Maintain 40-50% indoor humidity using a hygrometer; this minimizes dust mite proliferation and prevents mold growth that standard filters miss. Always close windows and doors while operating—units treat recirculated air 5x more efficiently than battling outdoor infiltration. Finally, clean pre-filters monthly by vacuuming or rinsing (per manual), as a clogged pre-filter causes 90% of “weak airflow” complaints. Avoid the #1 mistake: Running Low speed in large rooms. Calculate proper sizing using CADR × 1.55 × room volume ÷ 60 = 5 ACH target.
Fix Weak Airflow, Noises, and Lights in 5 Minutes
Diagnose Weak Airflow in 60 Seconds
Check the pre-filter first—90% of “broken” units just need this cleaned. Verify no curtains block intake (causing 60% airflow reduction). Reset the filter indicator light, as some units throttle speed when life hits 0%. Pro tip: Hold your hand 6 inches from the vent—if airflow feels weaker than when new, replace the HEPA filter immediately.
Silence Rattling and Whining Noises
Rattling means the filter isn’t seated fully—power down and reinstall. Whining occurs when speed is too high for room size; drop to Medium. Clicking noises indicate debris in the fan—unplug, vacuum interior vents, and wipe blades with microfiber cloth. Critical fix: Never ignore overheating clicks—check clearance around vents immediately to prevent motor burnout.
Decode Indicator Light Confusion
Solid red means replace the filter NOW—continued use damages the motor. Blinking red signals incorrect installation; reseat the filter. Red+blue combinations indicate overheating—move the unit away from heat sources. Pro tip: If lights malfunction after filter replacement, hold the reset button for 10 seconds to force recalibration.
Your 5-Minute Daily HEPA Purifier Routine
Master maintenance in under 5 minutes daily. Each morning, spend 30 seconds checking the indicator light and ensuring curtains haven’t shifted to block intake. In the evening, switch to High during cooking, set a 1-hour bedtime timer, and wipe exterior vents with a dry microfiber cloth. Weekly, vacuum the pre-filter, dust the unit exterior, and verify 2-foot clearance distances. Time-saver: Keep replacement filters stored vertically in their original packaging—this prevents gasket warping and extends shelf life by 6 months. Critical habit: Never operate without a filter—this pulls debris directly into the motor, causing permanent damage.
Upgrade When: 3 Signs Your HEPA Purifier Can’t Keep Up
Recognize these evidence-based upgrade triggers. If you’re running High speed 24/7 and still feel stuffiness, your unit is undersized for the space. Replacing filters every 2 months indicates excessive pollution load—add a second unit at the opposite end of your home. When unit noise exceeds conversation volume at Medium speed, it’s straining to maintain ACH. Next-level moves: Upgrade to smart models with app control for real-time air quality data, or install whole-house HEPA in your HVAC system for comprehensive coverage. Pro tip: For severe allergies, pair your purifier with a 40-50% humidity target—this CDC-recommended combo reduces symptoms 37% faster than filtration alone.
Final Note: A properly used HEPA air purifier slashes airborne particles by 99.97% within 24 hours—but only when positioned correctly, maintained diligently, and upgraded at the right time. Start tonight: move your unit away from walls, verify filter arrows point toward the motor, and set it to Auto mode while you sleep. Wake up to noticeably clearer sinuses and breathe the difference true HEPA performance delivers. Remember to vacuum pre-filters monthly and replace main filters before visual saturation—your lungs will thank you tomorrow.


